Global Setup: Workflows
Workflows allow you to take advantage of automatic processes that will guide your users through various steps in a process. These workflows are assigned in profiles and other areas of the system. This option is accessed from: Administration > HCM Setup > Settings > Global Setup > Workflows.
Two types of workflows are available.
Default: This workflow type is pre-configured with steps and action steps. The configuration assumes majority usage. These workflow types are a good way to start your workflow and then editing as needed.
User Defined: This workflow type contains only the Start and End steps and the workflow is then built by manually adding the steps and action steps.
Workflow Steps
Each workflow type may be customized by adding steps. Each step may be used more than once in a workflow, depending how the workflow is configured.
Upon saving, warning messages will be generated when a workflow step contains no action steps, or when an action step does not contain a Next Step setting. The warning message will contain a hyperlink of the affected step, which can be selected to easily return to and complete the step.
Not all the steps are available for all workflow types. The following list describes the most common.
Checklist: Allows you to define a checklist for the recipients. Once the workflow is executed the checklist will be assigned to the assignee in their To Do Items.
Collect Document: Add this step to an HR Checklist Item Request workflow to prompt recipients to add a document.
Finalize: Add this step to the Compensation Proposal Request workflow to prompt recipients to finalize the proposal.
Finalize Automatically: Add this step to the Compensation Proposal Request workflow to automatically finalize the proposal.
Display Message: When adding this step to a Questionnaire workflow, it will allow messaging text to be entered and shown to recipients.
Question: When adding this step to a Questionnaire Workflow, it will allow you to create a customized question to be shown to recipients in the workflow process.
Collect Note: Allows or requires notes to be entered at various stages during the workflow process.
Generate Notification: Allows communications to be generated to specific users or managers. In the Send Notification To field, a drop-down has options where you can select who will receive the email notification. If selecting Specific Email, an email address can be entered in the adjacent field. Attachments can be added to this step so that when a communication is generated, the attachment will be sent to the recipient. A delay can be set on this step, which will delay the sending of the notification for up to 99 days.
The delay option is especially useful for HR Recruitment where delaying the sending of a notification to an applicant is often needed for the Hiring Stage Change Request workflow. For example, if you have a workflow attached to a hiring stage where the candidate is rejected and you click the rejected hiring stage after the interview (since the candidate will not be considered), you may want to delay the notification to the applicant so they don't receive the rejection email moments after the interview.
Support for all Account tags is available in the Generate Notification step of an HR Action.
Join Steps: Allows multiple steps to be joined together before proceeding to the next step in the workflow.
Split Step: Allows a step to be split into multiple steps before proceeding to the next steps in the workflow.
Terminate Employee: Allows a step to terminate an employee.
Wait: Allows for a hold to be placed in the workflow and defines how much time must lapse until the next step will be executed in the workflow.
Sign Opt-Out: Allows a specific account or group to sign the chosen opt-out type.
HR Action: Allows an HR Action to be dependent upon the completion of a previous HR step. An HR Action will be automatically initiated when the preceding action is completed.
Highlight Next Step
Administrators can have many steps in their Workflows, making it difficult to see which steps are connected. To help identify which steps connect to each other, there is a visual indicator that highlights the next step when you hover over an Action step.
When an Action step of a Workflow is hovered over, the next step is highlighted. If no next step is configured, nothing is highlighted.
Header for the Generate Notification Workflow Step
Administrators may include a header in the Generate Notification Workflow Step using an option, Logo Header, which can be enabled via a checkbox that is disabled by default. The Logo is aligned in the center within the header, and the header includes the following settings:
-
Company Logo (upper left) - If the company does not have a logo configured, nothing appears for this.
-
A strip of color that reflects the company's Primary color in their defined System Theme.
Actions in Workflow Steps
Each step in a workflow will contain actions that will determine what will happen next in the workflow. At least one action must be added to each step to guide the workflow to the next step in the process. Some steps have additional actions that can be added, such as On Modified and others.
Upon selecting Save, warning messages will be generated when a workflow step contains no action steps, or when an action step does not contain a Next Step setting. The warning message will contain a hyperlink of the affected step, which can be selected to easily return to, and complete, the step.
Some of the most common Actions are:
On Created: This action kicks off the workflow and contains a Next Step setting to determine which step will be next in the workflow.
On Done: This action typically directs the step to end of the workflow.
On Approved: This action directs what happens next in the workflow after an approval action has been completed.
On Rejected: This action directs what happens next in the workflow after an approval action has been rejected.
On Expire: This action directs what happens next in the workflow once the time for manager action has passed.
Creating a Workflow
When creating a workflow, you will have the option to select a default workflow or to create a user-defined workflow. The default workflows contain most, or all the steps needed for the type of workflow being created. The default workflow can be edited to your liking by moving, adding and deleting steps. A user-defined workflow will only contain the Start and End steps and you must manually add steps to build the workflow.
Each step in the workflow will contain actions which can be edited to require certain actions by the user and to determine the next step in the workflow when the action has been completed.
The following procedure shows you how to create and edit a workflow. The steps involved may vary depending on the workflow type selected. Some workflow types may require additional steps.
To create a default workflow:
-
Workflow Maintenance: Navigate to: Administration > HCM Setup > Settings > Global Setup > Workflows.
-
Select Build Type: Click the Add Default button. (or select Add New for user-defined workflow).
-
Select Workflow Type: Select a workflow type from the Workflow Type drop-down. Click Add.
-
Workflow Name: Edit Name field.
-
Workflow Description: Edit Description field. Optional.
-
Move Steps: From this view, you can move the steps by selecting near the edges and dragging to the desired location. The connector lines will automatically move when the step is moved.
-
Review Steps: Each step in a default workflow will contain actions, which are shown inside the step. To edit a step, select anywhere inside the step and it will open for editing. Each step should be reviewed to ensure it is properly configured. Each action in a step should also be opened, reviewed, and possibly edited.
-
Delete Steps: If a step is not needed, you can delete it by selecting the X in the corner. To delete an action, open the step for editing and select the X next to the listed action. To edit an action, select the edit icon.
-
Add Steps: You can customize a default workflow by selecting the Add Step button. For example, the default workflow may contain only one Generate Email step and you may want an email to be sent to multiple individuals, or to one individual and one group. To accomplish this, you would add another Generate Email Step; one for the individual and one for the group.
-
Edit Actions: Click the edit icon to edit the action. Each action will contain as a minimum the Name, Description and Next Step settings. Most actions will also contain the Set Status To and Set Status Label To settings. And many of the actions will contain additional settings, such as filters, depending on the type of action being performed. The following descriptions cover the most common settings in an action.
-
Name: Enter a name for the Action. This name will be appended to the title of the Action type in the Step block of the workflow.
-
Description: Enter an optional description of the step. The description is for informational purposes.
-
Next Step: If the next step shown is not the desired next step when the action is completed, select the correct next step here.
-
Set Status To: Will default to the name of the action but can be edited to another option. Each Action will most likely contain different options.
-
Set Status Label To: This is an optional label that is used in reports and can be set to the same option shown in the Set Status To field. This label allows you to enter your own text when the action has been completed. For example, instead of using the system label of Approved, you can be specific and set the status label to Approved by Manager, or even use a specific name.
-
-
Add Actions: If another action should be added to the step, select the Add Action button. For example, for the Approve/Reject Step, you may want to add two On Approved actions; one might be for the employee's manager, and the other might be for a group.
-
Complete: Continue adding or editing steps until the workflow is to your liking. Whether you create a default or custom workflow, the steps described above will be used.
-
Save: When finished, save the workflow and assign.
Module Workflows
Additional workflows may be available depending on the modules and functionality enabled in the company. These workflow types are covered in the listed module's individual user guide or you can search online documentation.
Compensation Proposal Request Workflow (Compensation Management enabled): This HR workflow is covered in the Compensation Management User Guide.
Individual Data Removal (Data Retention enabled): This workflow is covered in the Data Retention User Guide.
Job Requisition Workflow (Recruitment enabled): This HR workflow is covered in the Recruitment-Talent Management User Guide.
Peer Feedback (Performance Management enabled): This HR workflow is covered in the Performance Management Peer Feedback User Guide.
Performance Review Request Workflow (Performance Management enabled): This HR workflow is covered in the Performance Management User Guide.
Individual Data Removal: This workflow is only available if Data Retention is enabled in the company. This is covered in the Data Retention User Guide.
SMS with Twilio Responses to Workflow Requests
Users currently have the ability to leverage SMS functionality for workflows through the use of the Twilio marketplace product, and respond directly to an SMS message to complete approve/reject requests stemming from the workflows. See the Configuring Communications with SMS topic in the SMS Integration with Twilio User Guide for more information.
HR: Workflow Descriptions
Benefit Plan Change Request: This workflow is assigned to benefit profiles under Administration > HCM Setup > Settings > Profiles/Policies > Benefits > Profiles. When an employee submits a change request to a benefit plan, the workflow will be triggered. The default workflow has the option to select a benefit enrollment admin group in in the initial set up. This workflow contains the following steps:
-
Approve/Reject
-
Checklist
-
Generate Notification
-
Join Steps
-
Sign Opt-Out
-
Split Step
-
Wait
Checklist Item Request: This workflow is assigned in the Upload Document checklist item under Administration > HCM Setup > Settings > HR Setup > Checklists. When an employee or user performs the task for uploading a document, the workflow will trigger. The default workflow has the option to select first and second level manager approvers in the initial set up. This workflow contains the following steps:
-
Approve/Reject
-
Checklist
-
Collect Document
-
Generate Notification
-
Join Steps
-
Split Step
-
Wait
Custom Form: This workflow is available for applicants and employees and gives users the ability to complete a custom form and follow a workflow outside of an HR Action Request, allowing users to receive notifications based on the current status of the workflow. The default workflow has the option to select a workflow subtype of Applicant Custom Form or Employee Custom Form, and then select a Custom Form Admin Group.
When employees process their To Do Items from a Custom Form Workflow, those employees will be able to see Manager notes as well as enter their own notes and upload documents when at the Modify step of the workflow. Notes can be accessed by employees from the footer of the To Do Item via the Notes icon and from the header of the form via the Notes icon.
This workflow contains the following steps:
-
Approve Automatically
-
Approve/Reject
Accept/Reject step of Custom Form workflows, a configuration option to collect a note is available, along with an option to make it required. With these options, when a manager does the approval or rejection, they can add the note in that same step without receiving a separate Collect Note To Do Item. The configuration options are disabled by default.
When Collect Note is enabled, upon clicking Approve and/or Reject from the To Do Item, a pop-up will appear where the user can enter their note for the approval and/or rejection.
When Collect Note is Required is enabled, the user must enter a note when doing the approve/rejection in this pop-up and will receive a message that a note is required if they attempt to approve/reject and a note is not entered.
The note added will appear to both employees/applicants and managers in areas they access where notes can be viewed.
-
Checklist
-
Collect Note
-
Generate Notification
-
Adding the Notes tag to the Message section will conveniently collect all notes added for the workflow up to the point the Generate Notification step is processed.
-
It will include the same information displayed when selecting the Notes icon, including the person who added the note along with the date/time the note was added.
-
When adding the Notes tag in the Message section of the Generate Notification step, the tag will be replaced with the actual text from the notes collected.
-
-
-
Wait
Update Checklist Item Setting
In the Approve Automatically step and the On Approved action of the Approve/Reject step, an Update Checklist Item checkbox is available. When you check this check box, the checklist will be updated when the custom form is approved.
Additional steps can be added to the workflows. The applicant workflow contains the checklist step. The Employee version of this workflow does not contain this step.
The On Approved action step will default to a Set Status To of Verified. Other options of New, Submitted, Modified, Approved, and Rejected are also available. Notes for the Apply Changes and Update Checklist Item settings explain that multiple triggers of this action will result in only the first attempt succeeding.
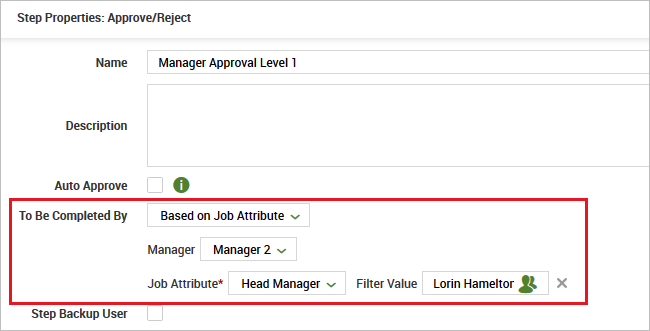
In the To Be Completed By field in the Approve/Reject step, you can choose options of Specific Account, Specific Group, Applicant, Hiring Managers, or Recruiter. You can also choose Cost Center Manager or Based on Job Attribute.
-
When selecting Cost Center Manager, additional fields will display allowing you to select the Cost Center and Manager (Manager, Manager 2, Manager 3). Another option to route the workflow to a new cost center manager is also available and contains an info icon explaining the setting.
-
When selecting Based on Job Attribute, additional fields will display allowing you to select the Manager Level, Manager (Manager, Manager 2, Manager 3) and Job Attribute. You can optionally add a Filter Value to the Job Attribute. When selecting a manager level, the To Do Item will be assigned to the person in the manager hierarchy that matches the specified job attribute or the manager level, whichever is first.
HR Action Request: This workflow is assigned to HR Actions under Administration > HCM Setup > Settings > HR Setup > HR Actions. When the selected HR Action is used, the workflow will trigger. The default workflow has the options of adding Number of Approvals (1-10), a To Be Completed Chain (HR Action Admin Group, or Manager Hierarchy), and an HR Action Admin Group Level 1. This workflow contains the following steps:
-
Approve Automatically
-
Approve/Reject
If Position Management is enabled, additional filtering options for Position Management and Base Compensation will be available when creating a custom HR Action Request Filter for an HR Action Request workflow. These filter options will also be available in the Start/On Created step.
-
Checklist
-
Collect Note
-
A Lock Note(s) option is available in the following steps of the HR Action Request workflow:
-
Approve/Reject: On Approved and On Rejected Action Items
-
Approve Automatically: On Done Action Item
-
Terminate Employee: On Terminated Action Item
-
-
When checked, users will be unable to add notes after that action is completed. Additionally, those users creating the workflow will receive a warning upon saving the workflow if they have attempted to add a Collect Note step AFTER a step that contains the Lock Note(s) enabled. The message states: “Make sure that the “Collect Note” step goes prior to any step where “Lock Note(s)” is enabled.”
-
If performing the Approve/Reject and/or Terminate Employee action(s) in the All To Do Items report, if these steps have the Lock Note(s) setting enabled in the HR Action Workflow, no further notes can be added through the report actions.
-
-
Generate Notification
Adding the Notes tag to the Message section will conveniently collect all notes added for the workflow up to the point the Generate Notification step is processed.
-
It will include the same information displayed when selecting the Notes icon, including the person who added the note along with the date/time the note was added.
-
When adding the Notes tag in the Message section of the Generate Notification step, the tag will be replaced with the actual text from the notes collected.
-
-
Initiate HR Action Request
-
Join Steps
-
Split Step
-
Terminate Employee
-
Wait
Hiring Stage Change Request: This workflow allows users to use workflows to help manage job applications and the hiring process. To Do's are generated in workflows with steps/actions that move applications through the stages of hiring. Companies using this also have the Recruitment module enabled. The default workflow has the option to add a Hiring Stage Change Approval Admin Group upon initial set up. In the On Created step, a Job Requisition Filter is available and can be set to only include job requisitions matching the items included in the filter when the workflow is triggered. This workflow contains the following steps:
-
Approve Automatically
-
Approve/Reject
-
Checklist
-
Collect Note
-
Generate Notification
-
Initiate Form
-
Initiate HR Action Request
-
Join Steps
-
Split Step
-
Terminate Employee
-
Wait
Cost Center Manager: In the Approve/Reject, Checklist, Generate Notification and Initiate HR Action Request steps of the workflow, Cost Center Manager can be selected.
When selecting Cost Center Manager, additional fields will display allowing you to select the Cost Center and Manager of the cost center.
The Use New Cost Center Manager option can be selected as a way to ensure a newly selected cost center manager will receive the workflow's To Do Item if that manager is changed before the job requisition closes
Checking the Use New Cost Center Manager option will spin off another setting; If Manager was changed use the following Action, which will allow for a selection of On Approved or On Rejected (only for the Approve/Reject step: for the Checklist, Generate Notification, or Initiate HR Action Request steps: only the On Done option is available). For applicants to function properly, the Use New Cost Center Manager is required.
If recipients of the resulting To Do Item change the existing manager to the Cost Center Manager, an overnight system task will run and update the manager and move the To Do item.
Initiate Form: The Initiate Form step allows a step in the workflow where recipients will add the form set here. Both Government and Custom Forms can be assigned via this process.
This step also contains the Cost Center Manager option in the To Be Initiated By field and works the same as it does in the other steps of the workflow.
Incident Types: This workflow is assigned to Incident Types under Administration > HCM Setup > Settings > HR Setup > Incidents > Incident Types. When an incident is reported under My Employees > Employee HR Maintenance > Incidents, the workflow will trigger. The default workflow has the option to add an Incident Types Admin Group upon initial set up. This workflow contains the following steps: This workflow contains the following steps:
-
Approve Automatically
-
Approve/Reject
-
Approver Sign
-
Checklist
-
Close
-
Collect Note
-
Employee Sign
-
Generate Notification
-
Join Steps
-
Split Step
Offer Letter: The workflow is meant to give the user the ability to configure in such a way that multiple managers can take action (approve/modify/reject) and finalize accordingly. As soon as a user fills out the details in the Offer Letters page and submits, the offer letter workflow is triggered provided the user has selected a workflow in the Offer Letter Workflow field on the recruitment configuration page. One the workflow is initiated, editing of the offer letter will not be allowed.
The Offer Letter workflow contains the following steps:
-
Approve Automatically
-
Approve/Reject
-
Checklist
-
Generate Notification
-
Join Steps
-
Split Step
-
Wait
Questionnaire: This workflow is used to route a questionnaire to managers and employees. Questionnaire types can be selected for FMLA Qualifier and Wellness Check. These are assigned to employees under HR > HR Maintenance > Workflow Questionnaires. Additional customized questions can be added with the Question step. Once assigned to an employee, the workflow will be triggered.
The FLMLA Qualifier workflow contains the following steps:
-
Checklist
-
Display Message
-
Generate Notification
-
Join Steps
-
Question
-
Split Step
-
Wait
The Wellness Check workflow contains the following steps: The workflow will automatically contain multiple pre-defined wellness questions. You can delete or edit these questions. This workflow can be added as a scheduled event under Administration > HCM Setup > Settings > HR Setup > Scheduled Event.
Users will receive a To Do Item as a prompt to answer the questions.
The employee will have to log into their session daily to complete the workflow questionnaire.
It will not pop up like an event will. You can add an event to run daily reminding the user to complete their To Do Items.
You can also create a reminder company announcement pop-up that will display each time the employee log in to their session so they are reminded to respond to their To Do item and complete their questionnaire.
-
Checklist
-
Display Message
-
Generate Notification
-
Join Steps
-
Question
-
Split Step
-
Wait
HR: Workflow Delegation
Workflows may be configured to be designated from one user to another. Managers can designate their workflows to other users so that the other user can respond to workflow actions for the time specified by the initiator of the delegation. All workflows may be selected, and each type of workflow may have a different user designated.
The delegated user will be able to see workflow actions of the originator in their own To Do list.
Security must be enabled for users to be able to select delegates and to view and edit the workflows.
Enabling authority to the workflow delegation is done under the HR tab in the Employee section of a security profile under Administration > HCM Setup > Settings > Profiles/Policies > Security.
There is an Options button available for both settings which allow further filtering as to who can be authorized in this setting.
When a user logs in, they will access My Info
HR: Workflow Steps and Position Management
When Position Management is enabled and in use for a company, several additional options are available in workflow steps. For example, approvers can be automatically selected based on their current position. For additional information, please refer to the Position Management User Guide or search online documentation.
HR: Approvals Based on Job Attributes
Certain workflows can have their approval/rejection steps set to be completed by managers with attributes matching the specific Job Attribute settings defined in HR Jobs. By choosing this option, the system will hunt through the management hierarchy, starting from the highest level. If the person is unauthorized to approve, the system will route to the next person in the hierarchy and check their credentials, and so on until an authorized approver is found.
In the Approve/Reject step, the To Be Completed By option must be set to Based on Job Attribute. For a manager to approve the step, the manager must be assigned to a job that has a value defined for the Job Attribute selected in the approval step, and the value of the job attribute in the job definition must match the Filter Value specified in the workflow step.
If the initiator of the workflow is a manager in the employee's management hierarchy and has the specified setting in their Job Attributes, the request will automatically be approved.
HR: Manager Hierarchy
The following sections describe how to configure a manager hierarchy.
HR Actions Workflows: Automated Approvals Based on the Workflow Initiator
Approve/Reject steps in HR Action workflows include an option for automatic approval, based on the initiator of the request. The Auto Approve option in the workflow step enables the approval based on Manager Hierarchy or HR Action Creator Filter.
Manager Hierarchy
When Manager Hierarchy is selected, the request will be automatically approved if the following conditions are met:
-
The To Be Completed By Option requires approval by a manager.
-
The initiator belongs to the management chain that includes the employee's direct manager. The initiator must either be the direct manager or a higher-level manager.
-
If the initiator is not the direct manager, the manager must be at a level in the management hierarchy that falls in the levels specified by the Manager Level option in the workflow step.
If the initiator is not the employee's direct manager, notifications of any automated approvals from the upper-level managers are sent to the direct manager.
If the initiator is not in the management chain above the employee, the direct manager must approve the request.
The initiator and any subordinate managers in the chain down to and including the direct manager can make changes to the request if they require only a manager approval. The approval will be automatically applied in these cases.
HR Action Creator Filter
If HR Action Creator Filter is selected, a custom filter is used to identify the set of employees whose request initiation results in automatic approval. Multiple conditions can be included in the filter.
If no employees match the filter criteria, the workflow cannot progress. Consequently, it is recommended that a Step Backup user is configured to avoid problems when no initiators are available to approve the action.
Management Hierarchy and Approval Requirements
The Manager Level option is available in Approve/Reject steps of some workflows, which enables the manager at a specified level in a management hierarchy to approve or reject the previous step.
For example, using this feature, a department manager or director could be specified to approve the step. The management hierarchy is specified in the To Be Completed By option, and the manager at the specified Manager Level in that hierarchy will receive a To Do Item to approve the step.
The management hierarchies are enabled under Administration > HCM Setup > Settings > Global Setup > Company Setup. The employee's direct manager for each hierarchy is specified in the Manager's widget on the Employee Information page.
The management hierarchy and manager level are both specified in the Approve/Reject step options. The management hierarchy is specified by selecting the desired To Be Completed By option. The manager level is numeric, up to ten levels.
For example, this step could be included in an HR Action promotion workflow with the following hierarchy:
-
The direct manager of the employee receiving the promotion is Monica Coleman (Team Manager).
-
Monica Coleman's direct manager in the Manager 2 hierarchy is Eric Allen (Department Manager).
-
Eric Allen's direct manager in the Manager 2 hierarchy is Monica Gellar (Division Director).
Since Monica Gellar is the third level manager in the hierarchy, she will be required to approve the previous step.
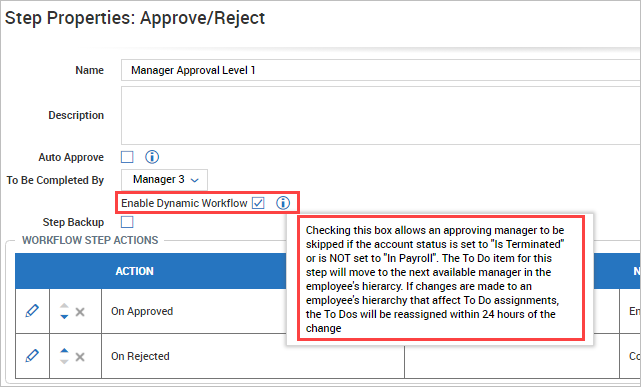
Enabling Dynamic Workflow
When Enable Dynamic Workflow is checked in an Approve/Reject step, it ensures that the workflow is routed to an approving manager in the employee's hierarchy in the event that the original approver's status changes to terminated or not in payroll.
However, if a level in the hierarchy is skipped due to a manager being terminated or on leave, and later that skipped position becomes active again, the pending To Do Item will be moved back to the original manager for approval. Additionally, if the employee's manager changes before the HR Action can be approved, the workflow moves the approval to the new manager within 24 hours and then proceed with the new hierarchy for approvals.