Configuration
The Recruitment Configuration page is accessed under Administration > HCM Setup > Settings > HR Setup > Applicant Tracking/Recruitment > Configuration. On this page, you will set items such as default profiles, job search page configuration, requirements, and see quick links to other configuration areas. Use the Edit Tabs option to add/remove widgets from this page. The Main tab contains widgets, sections, and settings.
Applicant Tracking/Recruitment Configuration Widget
In the Applicant Tracking/Recruitment Configuration widget, you can configure the following settings:

Enable Custom Career Portals: This checkbox makes the Career Portal field available in various sections on the Configuration page for both single EIN and multi-EIN companies. This allows you to apply settings to each career portal separately.
Enable Quick Apply: This setting allows applicants to apply for jobs via a one-page application using minimal information. Applicants will not be required to create an applicant profile but will be given the option.
Show Top Level Menu: N/A
Default Applicant Security Profile: Allows you to create and assign a security profile for applicants accessing your system to apply for jobs. This profile will also be assigned to former employees who apply for a new job, as the system will see them as a new applicant.
Default Applicant Data Retention Profile: If using Data Retention functionality, you can set a default profile for applicants here. Data Retention is used when personal or sensitive data supplied by applicants should undergo a limited storage timeframe in the system due to various privacy laws.
Default Applicant Demographic Profile: Allows you to set a demographic profile as a default to be included in the job application process.
Default Returning Employee Security Profile: This profile ensures returning employees can apply for jobs and will default to the applicant profile, which gives the former employee/applicant the proper security permission to navigate through the application process. If this profile is not desired, you can select and/or create and assign a different one.
Uploaded Resume Document Type: If the Marketplace App for document storage is enabled, you can define the document type specific to resumes so when they are uploaded, they are automatically marked as such.
Dashboard Layout Profile: When applicants create an account and log in, their default layout can be determined by the profile listed here. With this profile, you can control which widgets the applicants see.
Default Job Requisition Workflow: If populated, a new job requisition will contain the default workflow and cannot be edited from the job requisition. Removing a workflow from this default field will not affect any job requisition that previously had that workflow included.
Bypass Workflow For: This setting will allow designated users to add new job requisitions without going through the workflow process. When adding a new job requisition under Recruitment > Job Requisitions, the Submit button will not be available for these users. Users will simply save the requisition to create it, but all other users not included in this setting will be required to go through the assigned workflow process.
Default Offer Letter Workflow: Selecting a workflow here will add that workflow, by default, to each offer letter.
Use HR Action For Hiring: If enabled, and an HR Action Workflow is created for hiring, when viewing an applicant under Recruitment > Applicants, and then selecting Hire This Applicant, you will be prompted to choose the HR Action. You will then be able to complete all the steps in the configured Hire HR Action workflow, and submit when done, which will hire the applicant.
Require Selection of Job Application for Hire: When checked, users will be required to select a job application during the hiring process. In the Job Applications selection list, only applications where all required hiring stages have been completed will display. This option is also available in HR Actions and will work the same way.
Hide Applicant Hiring Stages: When checked, the Applicant Hiring Stages widget will be hidden from managers/users when viewing applicants. An Info icon displays the following message: Selecting this option will hide the Applicant Hiring Stages widget on the applicant information page.
Once you enable custom career portals, the Career Portal Configuration section is refreshed for both single EIN & multi-EIN companies. Upon refreshing, the Career Portal setting becomes available in various places on the Configuration page. The Career Portal drop-down field contains the defined career portals created and active for the selected EIN under Global List Definitions. The Configure button will open a separate configuration page allowing you to customize your career portal with a cover image, cover text, logo image, text, and colors. This is available for each EIN in multi-EIN companies.
For multi-EIN companies, the Career Portals for each EIN can have separate logos, cover images, text, and display only jobs specific to that EIN. An EIN specific URL link will be shown in the Career Portal Setup Instructions widget on the Instructions tab of the Recruitment Configuration page, and show only the jobs for that EIN based on the selections in this section.
On the Job Requisition page in the Career Portal Page Links widget the Show Job URL link, if utilized, will also show the correct logo, cover image, and text selected for that EIN as specified in the career portal page configuration.
Career Portal Configuration page
Upon selecting the Configure button, the Career Portal Configuration page will open, and you can configure your portal by adding logos, cover text, colors, headers, and themes. As you add and edit settings, previews for both desktop and mobile will show you how your portal will look to your applicants.

Logo Image: Choose an image from those stored on your computer. The heading is hyperlinked, and when selected, will take you to the Logo maintenance page where you can upload more images and then return to the career configuration page and select the newly-added logos.
Cover Text: This text will display across your background image. 60 character limit.
Cover Text Color: Options are Light (white) or Dark (black) for the lettering of your cover text. The Header Image field must be set to "Default" or "Upload Image" before you can change the cover text color.
Hide DBA/company name: If your company has a DBA name, or even a company name you don't want displayed to applicants, check this box. By default, these names will display in the header.
Hide Cover Text: Checking this option will hide your cover text. For example, you may want your company name displayed, but not your cover text.
Header Image: Select the header image you would like. Options are None, Default, or Upload Image. Minimum size for a header image is 1920 x 1080.
-
Upload Image: When selecting this option, additional options will open that allow you to upload a new image for your background. These images are pulled from the images stored on your computer. Once the image loads, you can adjust the position of the image in a preview window, both for Desktop and Mobile. If you later decide to reposition the image, you can select the Adjust image position edit icon.
Select Theme/Primary: This allows you to select system color themes to apply to your portal. The Primary area will display the colors being used and system themes cannot be edited. If the system themes are not desirable, you can create custom themes. After selecting Custom, the Primary area will become active and you can select the color bar and a color selector will display where you can customize your color theme.
Career Portal pages and Job Requisitions
When the Enable Custom Career Portals setting is enabled, you can select a career portal directly from a job requisition. A Career Portal Page setting with a drop-down list will display in your Requisition Details widget, allowing you to select the desired career portal for the job requisition posting.
The job requisition will be made available on the respective EIN link, the Career Portal link, and the All Jobs link, whichever is used in the career portal based on your configuration.
A tile A container that provides navigation or action from its summary view. will appear on the career portal for each job requisition you add to the career portal page. The first 250 characters of the job description from the job requisition will appear in the tile; if the description is longer than 250 characters, an ellipsis will indicate there is additional description verbiage available. Only text will appear in the tiles; if you have images or links within the job description, they will not appear on the tiles. The job title in the tile is a hyperlink that will open the job requisition for the applicant.
-
Job Requisition Report Page: An Update Career Portal button is on the Job Requisition report page. When selecting one or more job requisitions from the list and then using this button, a pop-up message will display allowing you to select a career portal to apply to the selected job requisitions en masse. All updates must be from the same EIN.
-
Job Requisition Templates: The Career Portal Page setting will also be available in the Requisition Details widget within Job Requisition Templates. On the Job Requisition Template report page, a Career Portal column is available to be added.
In the Show Job Page Configuration section, you can configure the following settings:
Show All Jobs Button Redirection: This checkbox will redirect applicants to your customized URL listed in the External URL for Show All Jobs Button instead of the default Career Search URL.
External URL for Show All Jobs Button: List the URL to be used when the Show All Jobs Button Redirection checkbox is checked.
Use this section to embed career pages in another website, such as your own career page. Unlimited numbers of hosted domains can be added if you have multiple websites. Refer to the Info icon for more details.
In the Hosted By Configuration section, follow these steps to embed a Career Portal on a hosted web site:
-
Select Add Hosted By and enter the host website’s URL in the Hosted By field.
-
Select the Add Hosted By button again.
-
Copy the Embedded Login URL and paste to modify.
https://secure3.saashr.com/ta/COSHORTNAME.careers?InFrameset=1&HostedBy=www.websitename.com -
Modify the Embedded Login URL link to include the landing page by adding the landing page between “.careers?” and “InFrameset”. This will embed/iFrame the career page, job, or map into your host website.
Choose from one of the following landing pages:
-
CareersSearch& (for all EINs): The career portal will display all job requisitions for all EINs.
https://secure3.saashr.com/ta/COSHORTNAME.careers?CareersSearch&InFrameset=1&HostedBy=www.websitename.com -
CareersSearch&ein_id=XXXXXX& (replace X’s with EIN ID Number): The career portal will include only job requisitions which the client created for a specific EIN in Ready.
This is not based on the Location field.https://secure3.saashr.com/ta/COSHORTNAME.careers?CareersSearch&ein_id=XXXXXX&InFrameset=1&HostedBy=www.websitename.com
Note: Adding CareersSearch& gives the client permission to view the Career Search page.-
ApplyToJob=XXXXXXX& OR ShowJob=XXXXXXX& (replace X’s with Job Requisition Number): The career portal will display a specific job requisition which will include the details for the job as populated in the job requisition.
https://secure3.saashr.com/ta/COSHORTNAME.careers?ShowJob=XXXXXX&InFrameset=1&HostedBy=www.websitename.com -
ShowMap&: The career portal will show all job requisitions in the Ready account on a map.
https://secure3.saashr.com/ta/COSHORTNAME.careers?ShowMap&InFrameset=1&HostedBy=www.websitename.com
-
-
Embed/iFrame the Career Page, Job, or Map into your host website.
If using Data Retention functionality, which determines how long personal information is stored in your system, you can configure a consent question and consent explanation, which will show to applicants when applying for jobs.

Consent Question: Enter a message to be displayed to an applicant for providing their consent for their personal information to be stored on your system longer than any retention period defined in the Data Retention Profile that is assigned to the applicant. For example, your profile may have a limit of 90 days, but because it may take longer than 90 days for the applicant to apply for all the jobs they are interested in, they may give their permission to keep their personal data on file for a longer period of time.
Consent Explanation: The explanation for the Consent Question can be entered here and displayed to the applicant.
This fields in this section allow you to set statuses for various hiring stages. The settings are hyperlinked, and when selected will take you to the Hiring Stages maintenance page where you can add/delete options for the drop-down lists.

On Job Application Created: Allows you to select the default stage of a job application upon being created in the system.
On Applicant Hired For Job Application: Allows you to select the default stage of an applicant upon being hired for a specific job application in the system.
On Applicant Created: Allows you to select the default stage of an applicant upon being created in the system.
On Applicant Hired: Allows you to select the default stage of an applicant upon being hired and moved to employee status.
Default Job Application Status: Allows you to select the default status of a job application when an applicant applies for a job. Default options include New, Rejected, OK, Considering. The setting is hyperlinked, and when selected will take you to the Job Application Statuses maintenance page where you can add/delete options for the drop-down list.
If your company is multinational, these settings give your applicants flexibility when applying for jobs. Selecting the hyperlinked title will take you to the Company Locales maintenance page where you can add more locales.

These options allow applicants to select different languages, including a language other than the company default. The languages available to select are driven by those configured under Administration > HCM Setup > Settings > Global Setup > Locales.
The default language will be automatically selected and grayed out and is based upon the default Locale specified under Administration > HCM Setup > Settings > Global Setup > Company Setup, in the Company Configuration widget.
Any fields with a configurable label such as HR Custom Fields, Applicant Custom Fields, and Job Requisition Custom Fields, in addition to the Applicant Profile tab labels, will not be translated into the selected language. The label for custom fields can be directly set in a certain language in the custom fields maintenance pages.
These options, when enabled along with the Integrated Document Storage Marketplace feature, allow existing employees to upload a resume when applying for a job as an internal applicant. The selections for this option are Is Enabled and Is Required.
The option to upload the file/resume is available to the employee under My Info > My Career > Search for Jobs. An internal applicant will have the choice to use a resume currently on file (if they have one) or upload a new resume. If they upload a new one, the original resume is overridden/deleted.
These options control the name and visibility of the Save and Save & Continue buttons applicants use when creating their profile.
Save Button Is Enabled : When checked, this enables the Save button and saves the applicant's entries.
Label For Save & Continue Button: This setting allows the applicant to save and advance. You can customize the label. There is a 35-character limit.
Knockout functionality allows users to define questions that can eliminate an applicant from consideration for an open job requisition, as well as define when an applicant who was knocked out can re-apply.
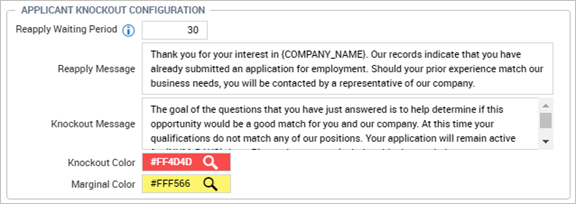
Reapply Waiting Period: When an applicant is knocked out, this setting determines the number of days before the applicant can re-apply for the same job. The system default is 30 days, which can be updated to fit your company's requirement.
Reapply Message: A default Reapply Message is included in this text box and will display to an applicant if the applicant attempts to reapply for same job before the re-eligibility criteria is met. This message can be updated to your company's desired verbiage.
Knockout Message: A default Knockout Message is included in this text box and will display to an applicant if the applicant answers a question that is marked as a knockout question on a questionnaire. This message can be updated to your company's desired verbiage. A custom Knockout Message in a questionnaire will take priority over this default message. If the custom message box in the questionnaire is blank, this default message will display.
Knockout Color: This setting can be used to select a color for the knockout items/questions. You can customize through a color chooser.
Marginal Color: This setting can be used to select a color for marginal items/questions. You can customize through a color chooser.
Hiring Managers Widget
This optional widget allows you to enable and label up to three Hiring Manager labels that will display in each job requisition. You can then specify hiring managers for each job requisition. When Required is checked, this will then require a hiring manager to be listed in the Contact Information section of job requisitions. This will be valid for new and existing job requisitions. The Used checkboxes must be enabled to activate the Required checkboxes.

Applicant Policies Widget
These options allow you to select information that is required by the applicant during the application process, as well as specify what the applicant uses to sign the offer letter, etc.
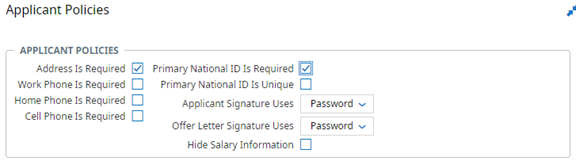
The Primary National ID checkboxes will require the applicants to enter their national ID according to the country in which they are applying for jobs.
The Applicant Signature Uses field allows choices of Password, Last 4 Of SSN, SSN, Last 4 Of NIN, NIN, Last 4 Of Primary National ID, or Primary National ID.
The Offer Letter Signature Uses field allows choices of Password, Name Entry, or Upload Signed Offer.
The Hide Salary Information setting, when checked, will hide the salary information listed in the applicant profile, so it is not visible on the applicant portal and applicant PDF.
Conversion Tracker Company Vendors Widget
This widget allows companies to enable and track the top recruitment vendors by listing their tracking ID number. This list shown is not configurable; the vendors shown are currently the only ones supported.
When using one of the vendors, a unique Id number is generated by the vendor for your account with them. You can then add this number to the widget for quick reference.
After you check the Enabled checkboxes, the Conversion Tracking Id information will be required.

Job Requisition Configuration Widget
This widget is used to display and require fields in a job requisition. When the fields in the widget are checked, they must be set on all new job requisitions or before saving any previously defined job requisitions.
Cost center trees will appear in the widget if the Display On Applicant Tracking Field setting in the cost center tree definition is checked. The cost centers are hyperlinked, and when clicked will open the maintenance page for that cost center so you can easily check how the cost centers are defined.
If you are also using Position Management, you can require a Default Position in your job requisitions. When checked, job requisitions must have a default position assigned.

You can display or hide certain job requisition fields and mark certain fields as Required. This allows you to hide fields that may not apply in certain countries or companies. These options also apply to templates.
Once these settings are saved, when you create, view, or edit a job requisition or job requisition template, those options not marked as Display will not show in the job requisition or job requisition template. All fields will be marked as Display by default. For those options marked as Display, they may also be marked as Required to contain an entry upon saving the requisition or requisition template. Job requisitions are created under Recruitment > Job Requisitions.
For each of these sections in the widget, select the applicable checkbox(es) to display and/or make the fields required on the job requisition.
-
General Required Fields
-
Job Details (for users creating job requisitions)
-
Compensation (for users creating job requisitions)
Custom Fields Section
For custom fields, the Display/Required settings are set in the Job Requisition Custom Fields maintenance page (Settings > HR Setup > Applicant Tracking/Recruitment > Custom Fields > Job Requisition Custom Fields). These settings are displayed in the Custom Fields section of the Job Requisition Configuration widget.
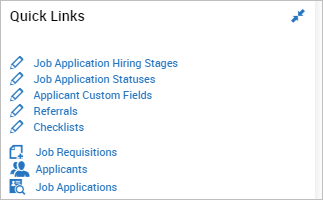
Quick Links Widget
This widget contains quick links to other configuration options. These options are also available by navigating to these paths in the Administration > HCM Setup > Settings > HR Setup >Applicant Tracking/Recruitment menu or from the Recruitment menu.
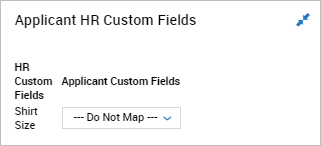
Applicant HR Custom Fields Widget
If HR Custom Fields have been defined under Administration > HCM Setup > Settings > HR Setup > Custom Fields, they will display in this widget. You can then determine actions from the drop-down list for each custom field which will display in the various tabs of the applicant profile.
The drop-down options are configured under Administration > HCM Setup > Settings > HR Setup > Applicant Custom Fields. The default setting is Do Not Map, or you can select to map the HR custom field to an Applicant Custom Field. You can add additional options in the Applicant Custom Fields configuration page.
Job Application Configuration Widget
This widget allows you to set how your job applications will look to applicants. You can choose which EIN the information will be applied to and choose a logo image, company name, and whether to include a company address.

Company EIN: Separate settings can be applied to the EIN selected in this widget.
Logo Image: Select a logo image or use the hyperlinked title to manage available images from the selection icon. Recommended size is 136 x 39 pixels.
Company Name: This is the company name that will appear on applications and downloaded PDFs. If blank, the company name shown on the job application will be DBA. If DBA is blank, the system will use the EIN legal name. If both DBA and EIN legal name are blank, the company name will be shown. The company names are pulled from the Company Address widget in the Company Setup page, located under
Company Address: Check to include the company address in the job application and downloaded PDF.
Forgotten Username/Password Preferences Widget
This widget allows you to control how the system will handle forgotten usernames and passwords for applicants, whether internal or external.

If Account Security Question Is Not Set, Require On Login: Checking this setting will require users without an account security question and answer to set them after logging in with their credentials. Users will be presented with a Set Up Security Question page which must be filled out before the applicant can proceed.
For each forgotten setting, a Notification hyperlink can be selected which will open the applicable maintenance page where you can view and/or edit the notification. A default notification will be sent to the user if a custom notification hasn't been configured.
Forgotten Username Settings: Checking Users Can Reset Forgotten Username allows applicants to retrieve their forgotten username. Upon validation of a username request, applicants are sent a pre-configured username notification.
Forgotten Password Settings: Checking Users Can Reset Forgotten Password allows applicants to reset their forgotten passwords. Upon validation of a password reset request, applicants are sent a pre-configured password reset notification.
When an applicant selects Forgot Password and they do not have a security question set, they will get a screen containing a Reset Password option, Username, Continue, and Back To Account Login buttons.
Upon selecting Continue, if system validates the user, the next screen provides the following message:
The username will be sent to one of the following options, selected by the applicant:
-
Personal Email (if on file, and will be masked)
-
Primary Email (if on file and is not a duplicate of personal email, and will be masked)
-
Secondary Email (if on file and is not a duplicate of personal or primary email, and will be masked)
-
Cell Phone (if company has SMS turned on and user has a cell phone number on file, and will be masked)
After selecting one of the options for delivery of the username, the user will select Submit. If no username or previous account exists, applicant can select the Create New Account option. Upon selecting Submit, the applicant is taken to a login screen that includes a success message:
The system will validate the applicant based on username. If system cannot validate user, the following message is given to the user:
The system will check and validate users based on the username. If the system cannot validate the user as a single account for a non-active employee, the system will not allow the user to proceed and will give one of the following errors based on the use case when the validation failed. The user's email and phone will be partially masked.
-
User identified as an active employee: Active employees must use the "Forgot Password" link in the Employee Login screen.
-
User's information does not exist in system: Invalid information for resetting your password. Please contact the company for assistance.
-
User's answer to security question is incorrect: Your answer to the security question is incorrect. Please try again or contact the company for assistance.
For returning employees: When processing the account of a terminated employee who attempts to reset their password on the career portal, the following actions will also take place:
-
Account is unlocked
-
Applicant Type changes to Returning Employee
-
Security profile changes to Returning Employee security profile (set in the Applicant Tracking/Recruitment Configuration widget)
Job Board Configuration Widget
If available, this widget may be found on the Job Boards tab of the Applicant Tracking/Recruitment Configuration page, or added using the Edit Tabs functionality. The information for this widget is covered in the Job Boards User Guide. Please download the PDF or search Online Documentation for more information.
eQuest: If you have an eQuest Marketplace app installed, and you have selected Enable Custom Career Portals, eQuest options will display within the Job Board Configuration widget. The Career Portal field will display with a drop-down list allowing you to select a career portal in which to apply eQuest configuration.
-
The system integration will send the company name defined in the Career Portal field of the Job Requisition page to eQuest when the job requisition data is sent via integration.
Indeed: If you have Indeed enabled on your system and have selected Enable Custom Career Portals, the Indeed section will contain a Career Portal field with a drop-down list allowing you to select a career portal in which to apply Indeed.
-
Reach out to Indeed directly to register the career portal name prior to sending jobs from our system. Once registered with Indeed, you can start using our XML integration. Our system integration will send the company name defined in the Career Portal field of the Job Requisition page once you are ready.
Career Portal Setup Instructions Widget
This widget can be found on the Information tab and contains the coding that can be uploaded for companies wanting to build their own websites. For multi-EIN companies, the EIN specific link contains an Info icon explaining how settings are applied to each EIN.

Company EIN: Select the EIN for which the portal will be applied from the drop-down list. An info message states:
Career Portal: Select a defined career portal created under Global List Definitions and is active for the selected EIN. An info message states:
Steps 1 through 3 and 7 support a custom-built job search page. For simplicity, we recommend that you use Step 4, 5, or 6.
-
Doctypes: The Doctype link will open a URL explaining the valid document types you should use when building a custom career portal.
-
Include Necessary JS Files: Use this code if you are custom building a career portal with Javascript.
-
Include Necessary CSS Files: This link is used if you are custom building a career portal with CSS file.
-
Create a Link Element - Generic showing all EIN's/job requisitions (<a href>): This will result in one central career portal for your default company. If you are multi-EIN and aren't concerned with dividing jobs into separate career portals, this option is the simplest.
Example: https://secure.saashr.com/ta/UBLJCHRE.careers?CareersSearch
-
Create Link Element - showing EIN specific job requisitions (<a href>): Creates a job search page for each EIN, which can contain a different header, colors, fonts and jobs that are specific to that EIN. The ein_id=number is the piece that directs to another EIN.
Example: https://secure.saashr.com/ta/UBLJCHRE.careers?CareersSearch&ein_id=978370
-
Create Link Element - showing Career Portal specific job requisitions (<a href>): Creates a job search page for the specified job requisition.
Example: https://secure.saashr.com/ta/UBLJCHRE.careers?CareersSearch&ein_id=978370&career_portal_id=1851394
-
Convert Above Link Element To Be Opened As A Popup: Use this script if you are custom building a career portal that will contain pop-up boxes.
Google Map Instructions Widget
This widget contains the following settings:
List of open jobs on Google Map: This URL can be used if you want your jobs to display on a Google map view. The jobs are represented by pins on the map. Selecting the pin will open details of each job represented in the pin. If there are multiple jobs in one location, they will allow display upon clicking the pin and applicants can scroll through the list and use the Apply link in the details to be taken to the career portal to apply for the job.
Embeddable iframe with Google Map with open jobs: This link is used to embed in a custom-built website.
