Adding and Editing Pay Statements
On the Payroll Prep Process page, you have two ways to edit data as you process payroll:
-
Add/Edit Pay Statements (covered in this topic)
Based on your company needs, you will probably use one method or the other as your preference.
The primary difference between editing batches and pay statements is the organization of the information on the page. Batches show information across employees and pay statements. The Pay Statement page shows all of the information for a single pay statement at a time.
To access Add/Edit Pay Statements, select the View Pay Statements link from the Add/Edit Pay Statements step.
On the Pay Statements report page, you can add a new pay statement, edit, review, and delete pay statements.
Utilize the following options for a selected employee:
-
Use the View/Edit Pay Statement icon to edit the pay statement for the employee.
-
Use the Preview Pay Statement icon to preview the pay statement for the employee.
-
Use the X icon to delete the pay statement for the employee.
-
Use the Employee Information icon to access the employee’s Employee Information page.
-
Select the link in the Type column to view or edit the pay statement type listed for the employee.
-
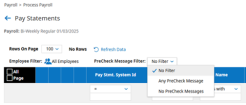
Employee category records that display on the Pre-Check Report highlight changes to employees that will affect payroll outcomes. A PreCheck Message Filter drop-down field is available on the Pay Statements report page. Options include:
No Filter: This default option does not change any filtering on the report. This shows both records for employees that do and do not have pre-check records.
Any PreCheck Message: This filters the report to only show records associated with employees that have any pre-check records, regardless of the type, but only if they are of the "Employee" Category of the pre-check message.
No PreCheck Messages: This filters the report to only show records associated with employees that do not have any pre-check records.
Editing a Pay Statement
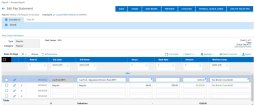
To view or edit the detail for an employee’s pay statement, select the pencil View/Edit Pay Statement icon and you will be navigated to the Edit Pay Statement page.
Similar to the Batch Edit page, you can manually enter data that will appear on the pay statement.
Select the Add Rows button to create additional rows. You can add columns to enter cost center overrides, shifts, etc.
Utilities for Pay Statements
Select the Utilities button to access the following options for managing a single employee:
Reset Automatic Lines: This option allows you to reset blocked or overridden values.
Options: This button allows you to access more options that you can apply to this pay statement.
Tax Overrides: Select this button to enter overrides to the pay statement.
Tax Overrides (Advanced): Select this button to enter tax overrides with advanced details to the pay statement.
Add Selected Earnings/Deductions: Select this button to add earnings and deductions to the pay statement.
Payroll Alerts: Select this button to view any Payroll Alerts related to the employee.
Preview: Select this button to preview the earnings statement for the employee.
Labor Allocation: Select this button to review the detailed Labor Distribution for this pay statement for the employee.
General Ledger: Select this button to preview the General Ledger entries associated with this pay statement for the employee.
Close Pay Statement: Select this button to close the pay statement for the affected employee.
Employee Information: Select this button to go to the Employee Profile My Team > Employee Information) and make any necessary updates to the employee record.
Viewing Pay Statements
To view pay statements, check the boxes for multiple pay statements and select the View Selected button. Then you can select the arrow buttons to move forward and backward among the selected employee pay statements.
To preview the look and feel of the employee's pay statement, select the Preview button on the Edit Pay Statement page.
Adding New Pay Statements
From the Pay Statements page, select the New Pay Statement button that is at the top of the page.
In the Add For field, choose whether you want to create a new pay statement for a Single Employee or for Multiple Employees. For a single employee, select the employee in the Employee field or select the Employees icon to bring up a larger list. For multiple employees, select the Employees icon, choose the employees you want to add, select Add Selected, and then select the Use Filter button.
In the Pay Statement Type field, choose the type, then select OK. The system creates the pay statement.


