E-Verify Requests
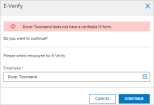
To add and manage E-Verify requests, navigate to HR > Employee Maintenance > E-Verify report page and click the Add New button. Select an employee from the selection list. If the selected employee I9 form is not verified, a message will display.
If the Override Use Online Form I9 setting is set to Optional in the E-Verify configuration, you will be able to continue with a non-verified online form.
E-Verify and I9 Forms
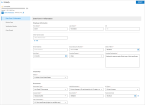
On the Enter Form I-9 Information tab, enter required fields such as the employee social security number, date of birth, hire date, overdue reason for completing the verification, citizenship status, and document types for proof of citizenship (passport, license, etc.)
If the employee has already completed a Form I9 in the system, this information will be pre-populated based on that form. By completing this section and clicking Submit, this will create a case with E-Verify, which will then generate an immediate response. The case can be monitored from this page under the Verification Results tab. When complete, the case can be closed and then viewed under the Case Closed tab.
This is based on the employee's default cost center address assigned to them in their employee profiles (if using addresses in cost centers). If not using cost center addresses, the system will look to the employee's home address.
Employee Information: Enter all required information. It is advisable to also enter optional information such as the email address, other names, and middle initial.
Overdue Reason: If the form is overdue from the date of hire, a reason will be required. Options include some standard reasons and Other, which spins off a user-defined explanation text field where you can enter your own reason.
Citizenship Status: Multiple options are available from this drop-down. Options are: A citizen of the United States, A noncitizen of the United States, A lawful permanent resident, and An alien authorized to work.
Document Type: Select the document types for this case that can verify an employee identity. Options are List A Document and List B and C Documents.
List A Document: This option allows for the selection of U.S. Passport or Passport Card depending on selected status (a citizen of the United States, or a noncitizen of the United States.) Once selected, additional fields for list the number and expiration date will display.
List B and C Documents: When selecting this option, a List B Document field will spin off and from the drop-down, you can select items such as driver license/ID card, government card, school ID card, voter registration card, and more. If selecting driver license/ID card, more fields will spin off where you must enter details of that type of document (Issuing state, document #, expiration).
Select a secondary form of identification in the List C Document field. Options here depend on the selected status of the employee and can include unrestricted social security card, various types of birth certificates, ID card, and authorization documents.
When you click the Add E-Verify Request button from an I9 form page, you can confirm whether to create an E-Verify Request using the same validation behavior found when creating an E-Verify Request from HR > Employee Maintenance > E-Verify.
In the I9 form, click the Add E-Verify Request button. You receive one of the following validation messages or the E-Verify Request window.
-
If you click the Add E-Verify Request button and the system doesn't find a completed request, you can proceed to the E-Verify Request creation screen.
-
If you click the Add E-Verify Request button and the system finds that a completed request already exists for the employee, you receive a pop-up with the warning message First name> <Last name> already has a completed E-Verify request. Do you want to continue?
-
If you click the Add E-Verify Request button and the system finds that an open request already exists for the employee, you receive a pop-up with the warning message First name> <Last name> already has an open E-Verify request. Do you want to continue?. You can click the Review Duplicate button to go to a report listing all the employee other E-Verify equests.
-
If you or other administrators do not possess one or more required data fields needed to create E-Verify requests, which includes name, phone number, and email address, you receive a warning message and you cannot proceed with the creation process.
-
If your organization has a pending termination status with E-Verify, you and other administrators will receive a pop-up with the warning message Your company has a status of Pending Termination; you don't have access to create E-Verify requests. In this case, you cannot proceed with the creation process.
Expiration Date: The E-Verify Expiration Date field has a limit of current date + 100 years. This will address scenarios such as the U.S. state of Arizona, in which a person's driver's license does not expire until they reach 65 years of age; after which is it renewed every 5 years thereafter. This allows valid expiration dates to be entered.
Document I-551 Requirements
Any I9 form created for an employee whose birthdate is on or after August 31, 1989 will be required to furnish Document Number I-551 with the I9 form.
In our application, when adding an I9 form in E-Verify and the date of birth meets the criteria AND the following is also set, the Document # field will display and be required.
Citizenship is set with one of these two statuses:
-
A lawful permanent resident
-
An alien authorized to work
Documents is set with:
-
List A Document
List A Document is set with:
-
Permanent Resident Card or Alien Registration Receipt Card (Form I-551)
Submitting After Entering Form I9 Information
After entering all the required and optional information, click Submit. This will create the case in the application, take you to the Review Case panel where the fields will be grayed out. Other options on the page will be available. An information message will display with some tips.
On the case page and above the left panel are links to the employee records and a completion status bar showing the percentage complete of the request.
Close Case: Clicking this button will immediately close the case. A verification pop-up will display giving you the option to continue or create a new case. The Current State column will display a status of Closed.
Edit Case: Click this button to edit the form. Once edits are complete, click Submit again to return to review mode.
Save Draft: Clicking this button will save your work and return you to the E-Verify Requests report page. From here, you can reselect the employee, complete the work, and finally submit the request. The Current State column will display a status of Draft.
Submit: When you are ready, click Submit to send the case to E-Verify. You will be advanced to the Verification Results tab.
Verification Results After Submitting E-Verify Case
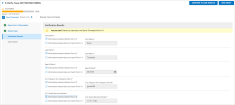
On this tab, you must confirm the data you are submitting matches the employee I9 form. If a piece of information does not match the employee I9 form, select that option and then edit accordingly. Once edited, select the option to indicate that it now matches.
Once ready, you can save and return to your work by clicking Save Draft, or you can proceed by clicking Continue To Case Results.
Upload Images
After clicking Continue To Case Results, you will be taken to the Verification Results page, where supporting identification picture files can be uploaded. Once the files are uploaded, click Continue.
Tentative Nonconfirmation
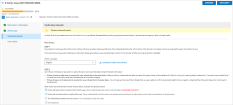
You will then be taken to another Verification Results page that will place your request in Tentative Nonconfirmation status. A user warning message explains what this page means. Steps explain how to proceed.
Step 1: Select a language and then click the link to download the Further Action Notice. This notice is given to the employee to review.
Step 2: Explains the consequences of the employee taking or not taking action on the Further Action Notice.
Indicate if employee intends to take further action to complete the requirements needed on the form by selecting the appropriate response. On this page, you can again choose to save and return to your work by clicking Save Draft, or if you are ready, click Continue.
Example of Further Action Notice: Tentative Nonconfirmation (TNC)
Referral Date Confirmation
This option will be available only if the first option is selected. After clicking Continue, you will receive a confirmation of the previous page selection. On this page, you will download the Referral Date Confirmation form. The form explains what you should do and lists the deadline for action.
Click Continue to proceed.
Example of Referral Date Confirmation: Tentative Nonconfirmation (TNC)
After clicking Continue, you will be returned to the E-Verify Request report page. The Current State column will list the request as Referred. This means the request has been submitted to the E-Verify for processing.
