Position Assignments
This section describes all the elements involved in assigning positions to employees.
Assignments To Positions Widget
The Assignments To Positions widget on employee accounts, accessed allows users to see which positions an employee was/is assigned to.
The widget can be added by clicking the Edit Tabs link and dragging the widget into the desired tab and then saving. Once added for one employee, it will be added for all employees the user has access to.

The Effective As Of date drop-down will display by date or will display All positions assigned to the employee.
Actions are available for the widget and for the employee.
Widget Actions
Add New: Add a new position assignment to the employee.
View Report: Opens the Employee Assignments report page and displays all employees.
Employee Assignment Actions
View/Edit: Opens existing assignment for viewing or editing.
Delete: Deletes the position assignment for the employee.
Assignment History: Opens the Assignment History report page. This report shows audit information for assignments and edits made for the employee.
Users will have access to this information if the user has edit access to the employee, or the user has just created the employee as a new hire.
The user can assign employees to Positions when the Employee Assignments setting within the assigned Security Profile on the HR tab, in the Position Management section is set to View/Assign Employees to Subordinate Positions.
The employee is not terminated.

Adding New Position Assignments
From the Employee Assignments report page, you can add new position assignments. When the Add New button is selected, a pop-up is presented where you select an employee, position and start date. The positions are presented depending on your assigned security profile settings.
Assignment Numbers
A system generated Assignment Number will be added to new assignments. If existing Positions were created prior to Assignment Numbers being available, the system will provide numbers for existing assignments. For any existing Position Assignments (i.e. active assignments, inactive assignments, assignments for terminated employees, etc.) we will auto-populate the Assignment with the next available value, in alphanumeric format. Deleted assignments are not included.
Assignment Numbers will be available in the following areas:
-
In the pop-up when editing an employee’s assignment.
-
In the Employee Assignments report page.
-
Employee Assignments Import Template.
The Assignment Number is the first column in the template, located in the HR category under Administration > HCM Setup > Settings > Imports > Overview and will update position assignments.
The employee and positions cannot be changed via this import, but all other fields should be able to be updated. If an Assignment Number is entered on the import template, the system will not validate any assignee or position information entered in that same row. The Assignment Number already validates the user and position.
If the Assignment Number in the import is NULL, the import will work as it does currently by creating a new position assignment, performing validations, and providing error messages if there are any violations.
If the Assignment Number in the import is not NULL AND does not match an existing Assignment Number in the company, the following error message will be generated. "The Assignment Number on [Line#] does not match any in the system. No updates were performed. Please adjust accordingly and import again."
If the Assignment Number in the import is not NULL AND does match an existing Assignment Number in the company, the values on the assignment that matches the Assignment Number will be updated.
If the criteria in Step 3 are met AND the user has included values in columns R (Rate/Hour), S (Rate Effective From), or T (Rate Effective To), the rest of the items in the row will be processed (provided they pass all existing validations) and the following message will display.
"The rate information provided for the Assignment Number on [Line #] has not been updated. Please adjust this manually on the assignment."
Assigning Employees
Positions can be assigned to employees from the following areas:
Team Menu
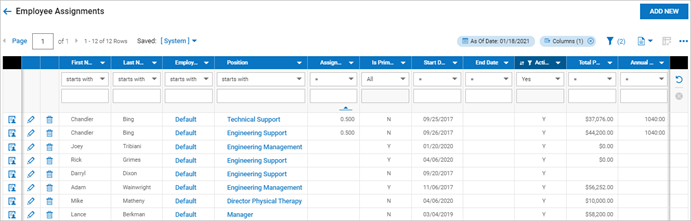
My Team > Employee Assignments
On this report page, all employees for which you have access will display. Here, you can add, edit, or delete position assignments. The employee account can be accessed via the Employee Information icon. Positions assigned to employees can be accessed by selecting the hyperlink in the Position column. The EIN can be quickly viewed and edited by selecting the hyperlink in the Employee EIN column.
Employee Accounts
Navigate to the Employee Information report.
Select an employee and locate the Assignment To Positions widget. If the widget is not displayed in the account, you can add it using the Edit Tabs link. Within the widget, click Add New under the triple-dot icon to create a new position assignment for the employee.
A pop-up is presented where you can select a position from the first field. The positions are presented depending on your assigned security profile settings. When assigning an employee to a position via the Position field, the pop-up will only allow the display and selection of active positions as of the date on both the suggestive search list and look-up window.
In a Multi-EIN environment, only those Positions which have been enabled for the employee's EIN are displayed.
If your security profile has the Assign Employees to ANY Position box selected, all positions are displayed. If your security profile does not have this box enabled, only those positions subordinate to your position are displayed. This includes only those positions that report to your position or to a position that in turn reports to you.
Position Maintenance
Administration > HCM Setup > Settings > HR Setup > Positions
Assign Employee
When adding a new assignment, select an employee and the system will analyze and open the Position field based on the user’s security and group permissions.
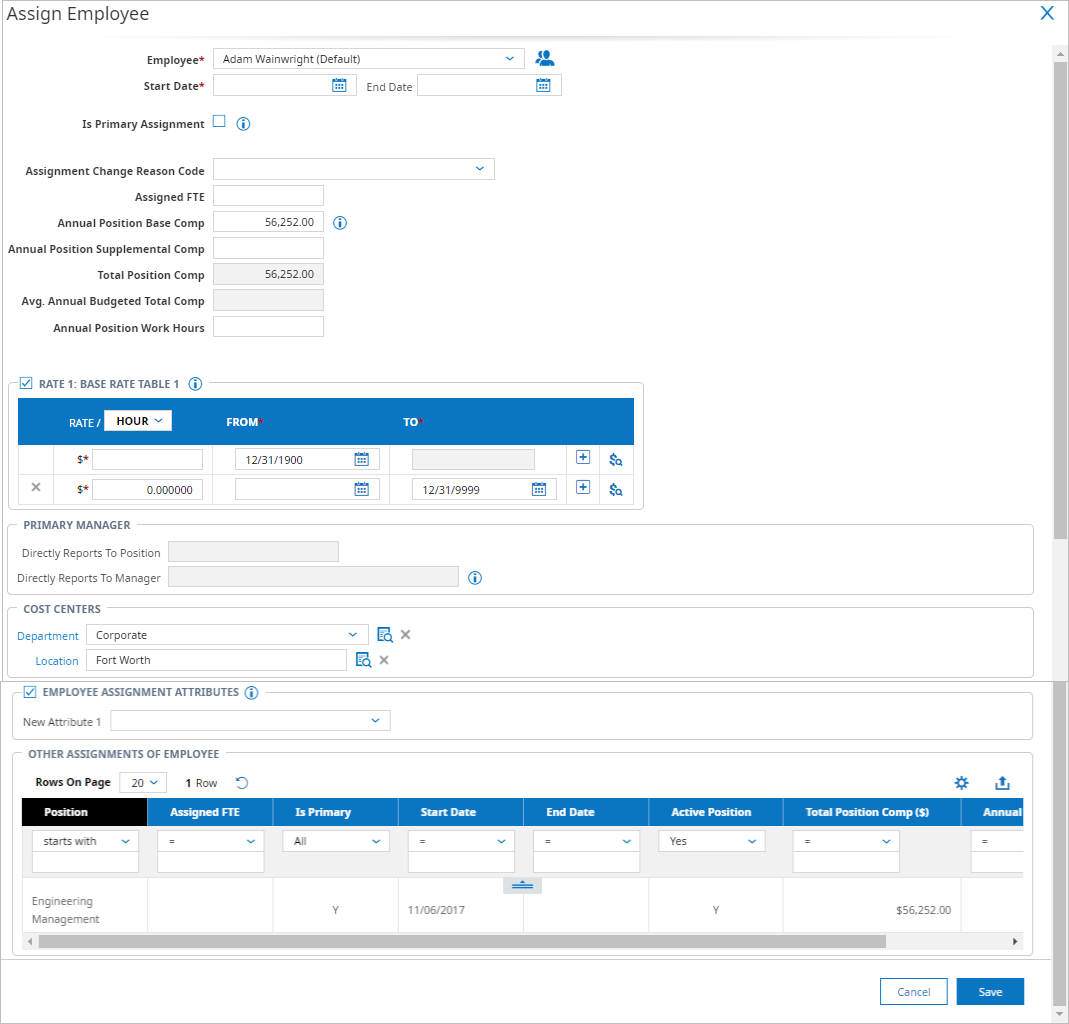
Employee : Select an employee. This list is limited to the user’s group and security permissions.
Position: After adding an employee, this field will open for selection based on the user’s group and security permissions.
Start Date: Select the date the employee will begin in the assigned position.
End Date: This is optional. If the assignment will end as of a certain date, enter that date here.
Is Primary Assignment: Check this box if the position will be the employee’s primary position assignment. An info icon is available, and when you hover your mouse over this icon, the message states, If checked, the defaults from this Position will be applied to the Employee. .
Assignment Change Reason Code: This field is typically used when changing an employee’s position assignment, though codes can be created when assigning a position. This will be determined by your company’s preferences and policies. You can make this field required from within the Position Management widget in Company Setup.
You can create and edit these codes under Settings > HR Setup > Position Assignment Change Reason Codes. When creating a new code and selecting the options under Type, the option of Other can be selected. With 'Type: Other', you can add a customized name and your managers will see that name when selecting a code. 'Other' can be added under different names, multiple times, as needed.
For example, you could add 'Type: Other' - 'Name: Salary Change' to create a salary change reason code. When your managers edit a job change or position assignment change, instead of seeing Other, they will see Salary Change in the drop-down selection list.
Assigned FTE: Enter the Full Time Equivalency (FTE) value for this position assignment; i.e., .50, 1.00, etc. This value will be used to calculate the Avg. Annual Budgeted Total Comp and Annual Position Work Hours fields based on the annual base compensation.
Annual Position Base Comp: This field contains the annual base compensation for this position assignment. After selecting a position, the base compensation from the position will auto-fill this field. An info icon is available, and when you hover your mouse over this icon, the message states, Will not update Employee Information. This value is required for the position but will not update the employee’s base compensation in their account.
Annual Position Supplemental Comp: If the position has any additional or supplemental compensation associated with it, enter that amount here.
Total Position Comp: The system will calculate total compensation based on Annual Position Base Comp and Annual Position Supplemental Comp.
Avg. Annual Budgeted Total Comp: This value is automatically calculated based on the Assigned FTE and Annual Position Base Comp values.
Annual Position Work Hours: If entering Annual Position Base Comp, this field will auto-fill with annual work hours.
Annual Position Work Hours: This value will automatically calculate based on the assigned position.
Employee Assignment Attributes: If the position has custom attributes that should be applied, select from the drop-down. If the position contains manager assignments or cost centers, additional fields will display.
Primary Manager
Directly Reports To Position: This field will auto-fill according to the selected position assignment and will display the position.
Directly Reports To Manager: In this field, you can specify the Directly Reports To Manager for the employee through the look-up provided. Note that even if there is one person in the position you want to select, it will not get auto-populated in the field.
Cost Centers
The cost center information will auto-fill according to the selected position assignment. You can edit and overwrite these fields by choosing other cost centers, if needed.
Rates
If the Is Primary Assignment setting is unchecked, rates can be applied to the position assignment. You must check the Rate Table checkbox to enable the use of the rate values. After entering an hourly rate, a plus sign will display in the row, and when clicked, will allow more rows to be added. An info icon is available, and when you hover your mouse over this icon, the message states, Entering a rate of pay here will create an entry in this employee’s Personal Rate Table. Rates can be added to new and existing assignments.
In the event you decide to turn off Position Management, any rate entries created in position assignments will be preserved as historical data in employees’ Personal Rate Tables in their accounts.
Rate/Hour: Check the rate table to enable the fields for editing. Enter an hourly rate for the position.
Calculate icon: Because the rate values entered here may be different from the position’s annual base compensation, an icon is available in each row, and when clicked, will update the calculation in the Annual Position Base Comp field. Each row in the rate section will contain this icon and any of the rates can be clicked to update the field. And note that the Annual Position Base Comp field does not update employee accounts with compensation data from the position assignment.
From: To avoid date validation warnings, this date will use the Start Date of the assignment. This will occur when adding a new assignment; it will not auto-populate when editing an existing assignment and will only populate the first row/section of the rate data. The date will remain editable if another date is needed.
To: If the rate will expire as of a certain date, enter that date here. This date is primarily used with multiple rate entries and one rate will expire as of a certain date and the next/new rate will then be applied as of the next From date.
[+]: After entering an hourly rate in the first row, the plus sign will display in the row and allow you to enter another row or rate values. The next row will contain a plus sign and so on as rows are added.
Other Assignments Of Employee
This widget will display other assignments for the selected employee to assist you when applying a new assignment.