Background Checks Report
You can initiate a background check in the system and then manage the requests.
An Initiate Background Checks button is available. Use it to initiate a background check from GHRR Marketplace. After you initiate a background check, you can check the details of the background check with the Background Check Details button. Other options are available to manage and view data.
Navigate to HR > Employee Maintenance > GHRR Background Checks.
Security Settings for Viewing/Managing Background Checks
Security profiles are located under Administration > HCM Setup > Settings > Profiles/Policies > Security. The settings can be enabled in the GHRR sections, located under the Marketplace tab. These settings allow users to view and manage background checks.
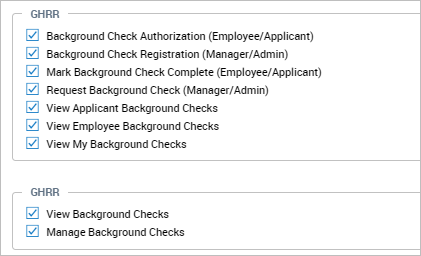
Background Check Authorization (Employee/Applicant): Gives users the ability to initiate a background check. This setting is for employees and/or applicants.
Background Check Registration (Manager/Admin): Gives users the ability to register their company with GHRR. This setting is for managers and/or admins.
Mark Background Check Complete (Employee/Applicant): Gives users the ability to manually mark a background check as complete. This setting is for employees and/or applicants.
Request Background Check (Manager/Admin): Gives users the ability to initiate a background check. This setting is for managers and/or admins.
View Applicant Background Checks: Gives users the authority to view background checks for applicants (if Recruitment enabled).
View Employee Background Checks: Gives users the authority to view background initiated on employees. Typically given to managers and admins.
View My Background Checks: Gives employees the authority to view their own background checks.
View Background Checks: This setting will activate the Background Checks and Background Checks History menu options under:
-
HR > Employee Maintenance > GHRR Background Checks
-
Recruitment > Background Check > GHRR Background Checks
Users will have read-only access to the reports, with the only option being an icon for Employee Maintenance (if users have access to employee accounts.) See the section for the Background Checks History report for more details about the data and options contained in this report.
Manage Background Checks: This setting will activate the buttons and icons needed to initiate and manage background checks.
Initiating Background Checks
To initiate a background check, users will select the Initiate Background Check button, and then select an Employee or Applicant and select Initiate. Users will only be able to view employees or applicants for which they have access. Initiate from:
-
HR > Employee Maintenance > GHRR Background Checks
-
Recruitment > Background Check > GHRR Background Checks
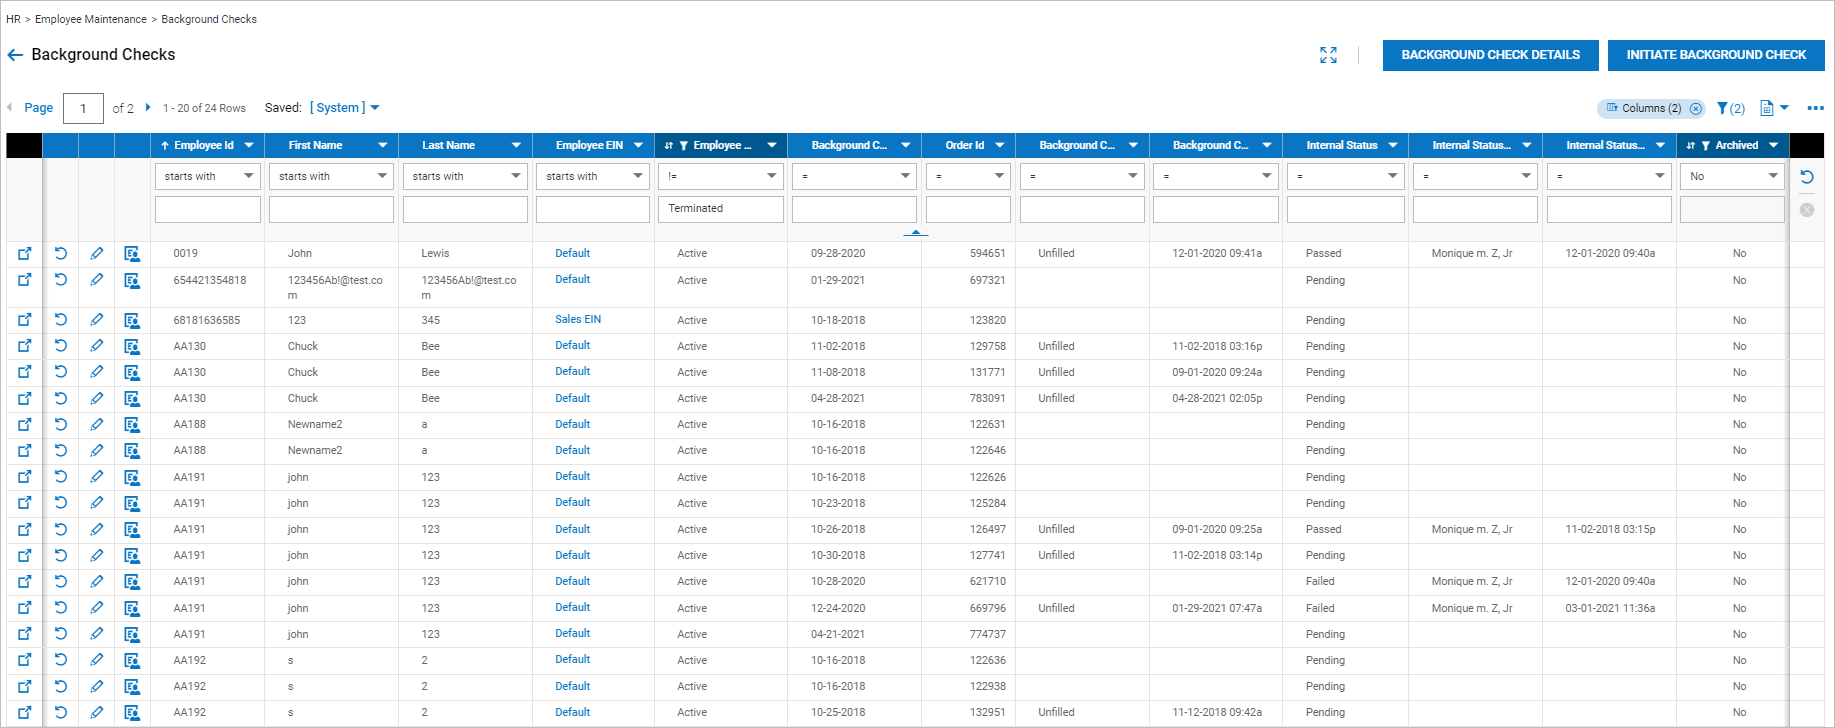
Background Checks Report Columns
The following columns are shown as standard columns within the report:
-
Employee ID/First Name/Last Name/Employee EIN/Employee Status: Standard information of the employee or applicant for which the background check is ordered.
-
Background Check Date: The date the background check was initiated.
-
Order ID: The order number assigned by GHRR to the requested background check.
-
Background Check Status: See the Statuses for Background Checks section below for more details.
-
Background Check Status Received On: The date GHRR received the background check request.
-
Internal Status: The status shown here is based on the statuses set in the Step 4 Background Check Statuses widget in the settings of the Marketplace configuration page. These statuses can be manually overridden by clicking the Edit icon in the report.
-
Internal Status Modified By: If the Internal Status has been manually updated, the user name of the employee will display in this column.
-
Internal Status Modified On: If the Internal Status has been manually updated, the date on which the status was modified will display here.
-
Archived: The archiving process is handled directly within the GHRR website, giving you control over setting the archived status. Once set there, this information will flow to our system, where the status will display as either Yes or No in this column.
Additional columns can be added to the report using the Add/Remove Columns action. The columns that can be added include multiple Applicant and Demographic columns. These columns will pull data from the applicant’s account.
From the Add/Remove Columns pop-up, custom columns can also be created for this report.
Statuses for Background Checks
When clicking the Refresh icon, the status of the background check, as reported by GHRR, will display within the Background Check Status column of the Background Checks report. Below, is information about how the statuses are determined.
Complete Status
If the response for a filled sub-order has at least one of the following status codes: hits, no hits, unable to verify, discrepancy, disqualified, negative-dilute, positive, drugpositive, positive-dilute, previous-positive, non-contact positive, or fail; the message in the background check will be:
The Background Check Status Column value will be: Complete
If the response for a filled sub-order has at least one of the following status codes: unknown, complete incomplete, see comments, data in review, possible hits found (additional research needed), out of scope, original in progress, unobtainable, contact MRO, review, lab-reject, test-canceled, or expired; the message in the background check will be:
The Background Check Status Column value will be: Complete
If the response for a filled suborder has at least one of the following status codes: clear, canceled, verified, no match, negative, drugnegative, pass, or expired; the message in the background check will be:
The Background Check Status Column value will be: Complete
Pending Status
If there are no unfilled sub-orders BUT at least one in progress suborder, the message in the background check will be:
The Background Check Status Column value will be: Pending
Unfilled Status
If at least one sub-order has unfilled status; the message in the background check will be:
Column value: Unfilled
Deleted Status
If at least one sub-order has been deleted; the message in the background check will be:
Column value: Deleted
Initiate Background Check Button
Click the Initiate Background Check button and proceed with selecting an employee/applicant and click Initiate. Users must have registered credentials with GHRR to use this option. After initiating the background check, users will be routed to GHRR to complete the order.
When it is complete, the requested background check will appear in the report.
Background Check Details Button
To view and possibly change the details of an initiated background check, click the Background Check Details button. Users will be routed to GHRR where the order can be viewed. Users must have registered credentials with GHRR to use this option.
Managing Background Check Requests: Icons and Options
Under the Background Checks report users with the proper permissions can manage background checks by using the icons for each request.
View Background Check Order (box with arrow icon): Allows user to view the background check order. Upon clicking the icon, the GHRR order page will open in a separate window. The order can be edited, completed or canceled.
Request Background Check Status (refresh icon): Allows users to check on the status of background check. Click the icon and the system will process and then dynamically update the Background Check Status column with the latest status of the report.
Edit Internal Status (edit icon): Allows users to manually edit the internal status of the background check.
View Applicant or Employee Information (people and paper icon): Allows users to view the applicant information data and take actions such as adding interviews, sending interviews as an iCal attachment, add job applications, email the applicant, hire the applicant, view or add notes, or download the information as a PDF.