Configuring Compensation Cycles
The Compensation Cycle Criteria is used to determine who should be included in the cycle. If left blank, all employees will be included. To configure the Compensation Cycle, navigate to Administration > HCM Setup > Settings > HR Setup > Compensation Management > Compensation Setup.
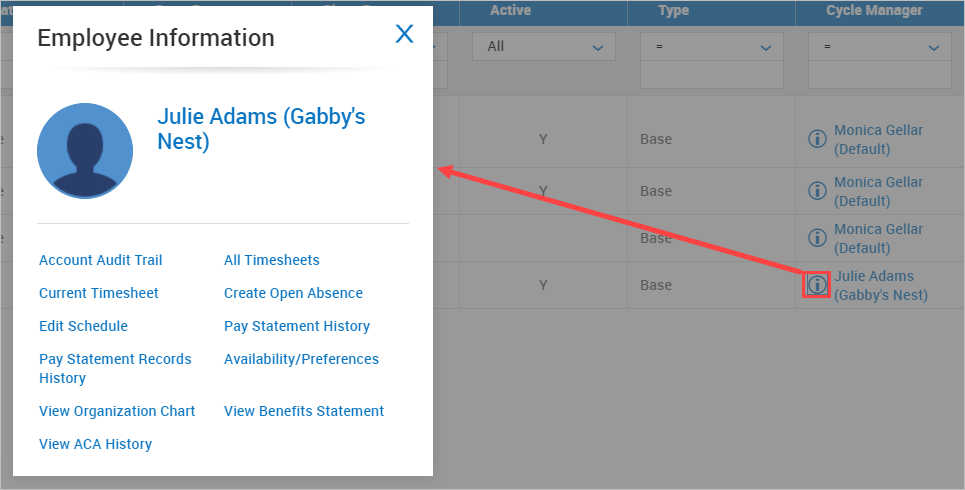
On the Compensation Setup window, if you have previously configured Compensation Cycles, you will see the list here. You can select the information Quick Links icon in the Cycle Manager column, and an Employee Information pop-up will display with links to various information for the Cycle Manager.
To create a new compensation cycle, select the Add New button, then select a Company EIN for the new compensation cycle. You will be taken to the Compensation Cycle window. Compensation cycles can be copied by selecting the Copy icon for an existing line item. When copying, the new copied cycle will open for editing where you can change the name and add cycle dates and any other information for the new cycle.
Compensation Cycle
Configure the following information:
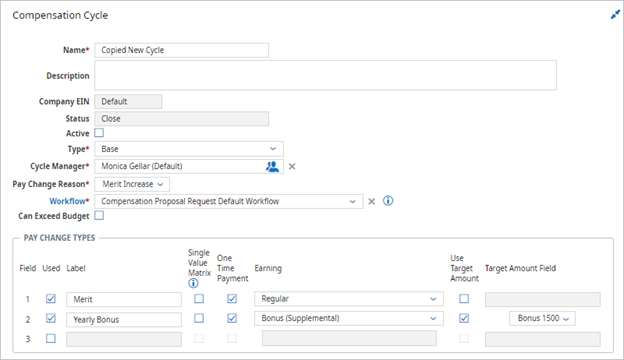
Name: Name of the Compensation Cycle.
Description: Optional description.
Status: Hard-coded as Budget.
Active: Determines if the Compensation Cycle is active or not. Proposals must be in Pending status to change this setting for existing worksheets.
Type: Currently Base is the only Type option. The Compensation Cycle will affect the employee’s Base Compensation.
Cycle Manager: Select the Manager responsible for this Compensation Cycle. Proposals must be in Pending status to change this setting for existing worksheets.
Pay Change Reason: Select the reason for the Pay Change Reason. This code will display in Employee Information when the compensation cycle runs, and the type of pay change that occurred will be described.
Workflow: Select the Compensation Workflow specific to this Compensation Cycle. The selected Cycle Manager is able to take part in any of the workflow steps associated with the compensation cycle. Workflow is a hyperlink, and when selected, you will be navigated to the Workflows page to edit or create a new Compensation workflow.
Can Exceed Budget: Check to allow the cycle to exceed defined budgets. Proposals must be in Pending status to change this setting for existing worksheets. In the event this setting remains unchecked (allowing managers to exceed the budget), any entries exceeding the set budget will display an error message to prevent a manager from exceeding the budget. The field(s) that need to be adjusted will be highlighted.
Pay Change Types Configurable categories used in HCM that define how budget funds should be allocated, for example, a specific amount may be allocated to merit increases and a different amount may be allocated for bonuses.: This widget allows you to enable and define the specific Pay Change Types. These fields control what types of changes can be processed at once in the cycle and will display on the worksheet.
-
Used: Check if the value will be used in the worksheet.
-
Label: The name of the pay change type.
-
Single Value Matrix: Checking the setting will automatically populate the compensation worksheet with the recommended increase. Only one checkbox can be selected. The Info icon informs you of this as follows: Using a Single Value Matrix will automatically populate Worksheet with the recommended increase to the Pay Change Type you select.
Once Single Value Matrix (auto populate) has been selected, the values available in the Merit Matrix drop-down of the Performance Review Settings widget will display only Single Value Merit Matrices. The proposed Pay Type in the worksheet will be auto populated when the performance rating value is generated via Send Score, Finalized or initially at the time of cycle creation and added to the worksheet. The auto populated amount will be editable.
-
One Time Payment: This option can be enabled to generate a lump sum payment for a specified Earnings Type.
-
Earning: This drop-down will display if One Time Payment is enabled. A One Time Payment is not applied to Base Compensation. Proposals must be in Pending status to change this setting for existing worksheets.
-
Use Target Amount: Will compute bonus payments based on a specific user-defined amount. When checked, will activate the Target Amount Field and drop-down.
-
The Target Amount Field drop-down values are based on Custom Fields set as Type=Currency, with a currency Default Value.
-
Visibility to the new options require the enablement of the Use Target Amount checkbox, located in the HR Settings widget of Company Setup. This setting will only display when Compensation Management is enabled in your company.
-
The values used for this functionality are pulled from Custom Fields set as Currency types. A Default Value (a currency amount) must be added to each entry. For example, you can have a custom field for multiple bonus amounts, i.e., Bonus 1000 = $1000.00 dollars, Bonus 1500 = $1500.00 dollars. Custom Fields are defined under HR Setup > Custom Fields.
-
Compensation Cycle Dates
To accommodate the various ways that companies schedule their compensation cycles, there are multiple compensation cycle date types:
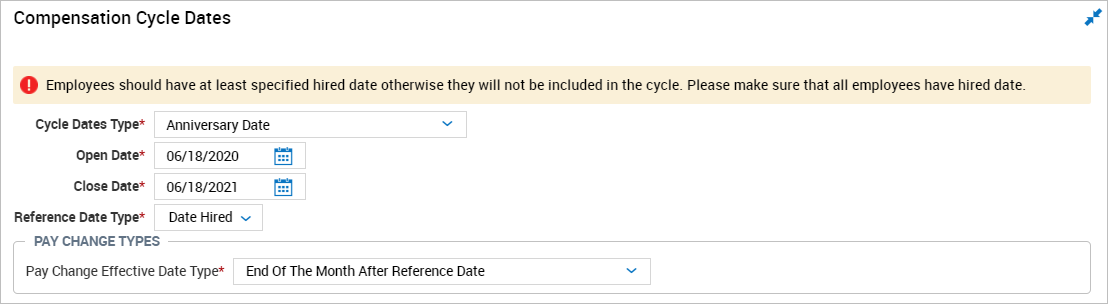
The Cycle Dates Type field includes these options:
-
Common Date: In a Common Date cycle, all eligible employees receive adjustments at the same time.
-
Anniversary Date: In an Anniversary Date cycle, the timing of the adjustment for an eligible employee is based on the anniversary of the employee's original or most recent hire date, or the most recent job start date.
Note: If you select the Anniversary Date, Anniversary Month, or New Hire/New Job options, the Reference Date Type and Pay Change Effective Date Type fields appear. See the Pay Change Types section for the descriptions of these fields. -
Anniversary Month: An Anniversary Month cycle is similar to an Anniversary Date cycle but combines all anniversaries that fall within a calendar month into a cycle that resembles monthly Common Date cycles.
-
New Hire/New Job: This type of cycle applies to employees who are completing an initial time period in a job, either as a new employee or as a job transfer. This type of cycle is identical to an Anniversary Date cycle, except that it happens once, at the end of a specified time period rather than on an anniversary.
Open Date: The date that the Compensation Cycle begins. This date cannot be changed after it is saved. A warning message will appear if the current date or a past date is entered.
Close Date: The date that the Compensation Cycle ends.
The Reference Date Type field includes the following options:
-
Date Hired: Date listed in Employee Information.
-
Date Started: If the employee was hired on one date, but began working on another date, this date should be listed in Employee Information.
-
Fiscal Date: This is the fiscal date in use for the company.
-
Calendar Date: Allows for a specific calendar date to be entered.
-
Date Re-Hired: If the employee has a rehire date, it will be listed in Employee Information, within the Dates widget. If the employee is missing this date in their account, an alternative Use drop-down will display, allowing you to select an alternative date or Date Hired, Date Started, or Fiscal Date.
-
Review Date: If the employee has a review date, it will be listed in Employee Information, within the Dates widget. If the employee is missing this date in their account, an alternative Use drop-down will display, allowing you to select an alternative date or Date Hired, Date Started, or Fiscal Date.
-
Benefits Date: If the employee has a date on which benefits began, it will be listed in Employee Information, within the Dates widget. If the employee is missing this date in their account, an alternative Use drop-down will display, allowing you to select an alternative date or Date Hired, Date Started, or Fiscal Date.
-
Seniority Date: If the employee has a seniority date, it will be listed in Employee Information, within the Dates widget. If the employee is missing this date in their account, an alternative Use drop-down will display, allowing you to select an alternative date or Date Hired, Date Started, or Fiscal Date.
-
Job Last Changed: If the employee has a date associated with their last job change, it will be listed in Employee Information, within the Dates widget. If the employee is missing this date in their account, an alternative Use drop-down will display, allowing you to select an alternative date or Date Hired, Date Started, or Fiscal Date.
-
Date 1 thru Date 5: These are custom dates that will be listed in Employee Information, within the Dates widget. If the employee is missing this date in their account, an alternative Use drop-down will display, allowing you to select an alternative date or Date Hired, Date Started, or Fiscal Date.
The Pay Change Types section includes the following field and options:

-
Pay Change Effective Date Type: This field determines when the Pay Change based on the Compensation Cycle should take place. Pay Change Types = Base Compensation Reasons. Options include:
-
Day In Following Month After Reference Date: When selecting this option, an additional field will display for the Pay Change Effective Date Day Num. Select a day of the month in which the pay change will become effective. I.e., If the pay increase should occur on the 15th of the month, select the 15th in this field.
The system will use the entry set in the Reference Date Type field and then calculate the month and apply the pay change to the selected day of that month. I.e., If using Hire Date and an employee was hired in the month of June and Pay Change Effective Date Day Num is set to 15, the pay change will go into effect on the 15th of July, on the following month after the reference date.
-
End Of Month After Reference Date: The system will use the entry set in the Reference Date Type field and then calculate the month and apply the pay change to last day of that month. I.e., If using Hire Date and an employee was hired in the month of June, the pay change will go into effect on the last day of June.
-
On Reference Date: The system will use the entry set in the Reference Date Type field and then calculate and apply the pay change according to that entry.
-
Compensation Cycle Criteria
The Compensation Cycle Criteria (displayed below) acts as a type of filter to pull specific employees into the cycle based on the criteria entered here. These fields are optional.
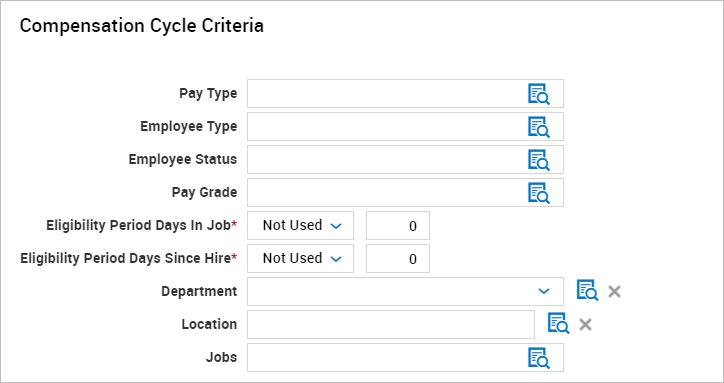
Pay Type: If the cycle will be restricted to employees of a certain Pay Type, select a list from the look-up. If a list does not exist, you can create one while making the selection. For example, the list may include Hourly and Non-Exempt types.
Employee Type: If the cycle will be restricted to employees of a certain Employee Type, select a list from the look-up. If a list does not exist, you can create one while making the selection. For example, the list may include Permanent and Staff types.
Employee Status: If the cycle will be restricted to employees of a certain Employee Status, select a list from the look-up. If a list does not exist, you can create one while making the selection. For example, the list may only include employees with a status of Active.
Pay Grade: If the cycle will be restricted to employees of a certain Pay Grade, select a list from the look-up. If a list does not exist, you can create one while making the selection. For example, the list may only include employees with a status of Active.
Eligibility Period Days In Job: Use this field to determine if employees should be in their job for a specified period of time before being included in this cycle. Options include: Less Than, Less Than Or Equal To, Equal, Greater Than Or Equal To, and Greater Than. Then enter the number of days in the second field. Even though this field shows as required, if it is set to Not Used it may be bypassed.
For example, if employees must be in their current job for at least 90 days before being included in this cycle, set the field to Greater Than Or Equal To and then 90 in the second field.
Eligibility Period Days Since Hire: This field allows you to have more cycle criteria options for Eligibility Periods that include the ability to select all employees hired after a specific assigned date (i.e., Hired Date, Started Date, etc.)
Example: Hired Date + Greater Than or Equal To + 10/01/2021, will include all employees with a hire date that is greater than or equal to 10/01/2021
Eligibility Period Days Since Hire: Use this field to determine that employees should be employed for X number of days since their Hire Date, as set in their Employee Information account. Options include: Less Than, Less Than Or Equal To, Equal, Greater Than Or Equal To, and Greater Than. Enter the number of days in the second field. Even though this field shows as required, if it is set to Not Used it may be bypassed. For example, if employees must be employed for at least 180 days before being included in this cycle, set the field to Greater Than Or Equal To and then 180 in the second field.
Department: Select the Cost Center department from the drop-down or the look-up.
Location: Select the location here from the look-up.
Jobs: Select a job from the look-up.
Performance Review Settings
This section allows you to add an optional Merit Matrix and one or more Performance Review Profiles to the Compensation Cycle.
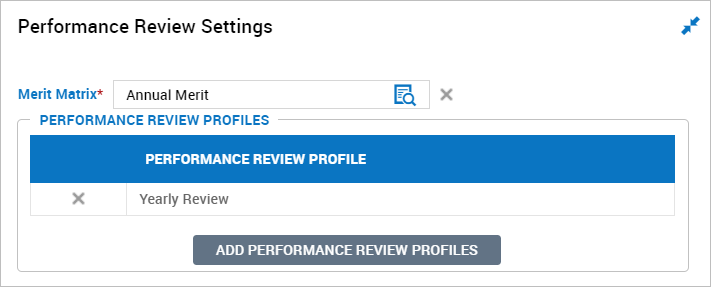
Merit Matrix: If a matrix has not yet been defined, click the Merit Matrix hyperlink and you will be taken to the Merit Matrix window. Click the back-arrow button in your session (not your browser) to return to this page, and then select from the Merit Matrix lookup. This can also be created by navigating to Administration > HCM Setup > Settings > HR Setup > Compensation Management > Merit Matrix. See the Creating a Merit Matrix section below for more details.
Add Performance Review Profiles: Click this button and select one or more profiles to be included in this cycle.
Compensation Cycle Prorate Configuration
On the Compensation Cycle page, pay increases can be prorated from the Compensation Cycle Prorate Configuration section. This functionality is useful in situations where an employee is hired mid-year and the suggested pay increase is the same for all employees, but since the new employee does not have the same amount of time as other employees, their pay increase can be prorated.
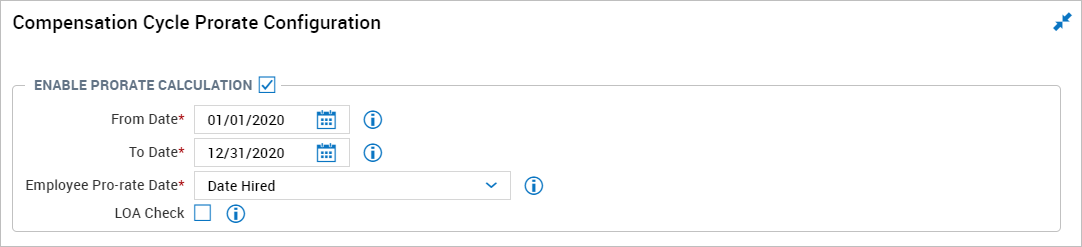
Enable Prorate Calculation: Check the box next to Enable Prorate Calculation, and the widget will display.
-
From Date: This date will set the beginning of the prorate period.
-
To Date: This date will set the last day of the prorate period.
-
Employee Pro-rate Date: This is the employee date to use to determine the prorate percent.
-
LOA Check: If this checkbox is enabled, the system will check to see if there were any days that employees were on Leave of Absence during the prorate cycle.
The following is an example without the LOA Check:
-
From Date: 01/01/2017
-
To Date: 12/31/2017
-
Employee Pro-Rate Date: Date Hired (05/01/2017)
-
LOA Check: No
-
Total days between 01/01/2017-12/31/2017 = 365
-
Total days between 05/01/2017 & 12/31/2017 = 245 days
-
245/365 = .6712
-
To get from decimal to Percent .6712 * 100 = 67.12
-
Then round Rounding is a way to simplify payroll accounting and reporting, and to enforce shift start and end times. Punch rounds divide hours into equal segments of an hour. to nearest whole value and add % indicator = 67%
The following is an example with the LOA Check:
-
From Date: 01/01/2017
-
To Date: 12/31/2017
-
Employee Pro-Rate Date: Date Hired (05/01/2017)
-
LOA Check: Yes
-
Total days between 01/01/2017-12/31/2017 = 365
-
Total days between 05/01/2017 & 12/31/2017 = 245 days
-
LOA Check shows that the employee was on LOA for 30 days
-
(245-30)/365 = .5890
-
To get from decimal to Percent .5890 * 100 = 58.90
-
Then round to nearest whole value and add % indicator = 59%
The prorated amounts will be available in the Mass Finalize report from Compensation > Proposals to Finalize.
After you save, multiple buttons appear at the top-right of the window, depending on the your security rights.
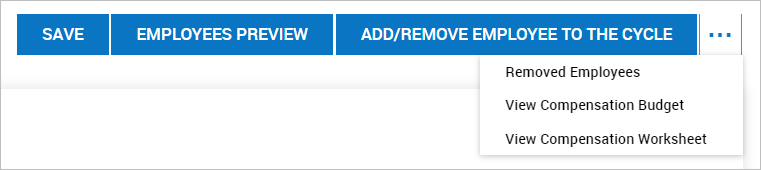
Save: Saves any edits to the widgets on the window.
Employees Preview: Displays the employees that will be included in the Compensation Cycle.
Add/Remove Employee To The Cycle: If no Employee Criteria is selected, all employees will be added to the cycle. This button enables manual addition or removal of employees from the Compensation Cycle. Users must have appropriate security permissions to remove employees from a Compensation Cycle.
Removed Employees: Displays the employees who were added to the Compensation Cycle and removed at a later time.
View Compensation Budget: Displays the Budget window for the Compensation Cycle.
View Compensation Worksheet: Displays the Worksheet window for the Compensation Cycle.