Corporate finance often controls how many hours store managers can spend to meet their customer demand. Often these are fewer hours than what is called for in the labor forecast. Ultimately, stores want a schedule that meets the needs of finance, while still enabling them to ensure a quality customer experience.
The definition of labor constraints helps stores achieve their financial targets.
The labor constraints feature provides the ability to:
- Increase the labor forecast so that it uses the entire labor budget up to the allowed maximum
- Decrease the labor forecast to the minimum weekly labor budget
This feature also provides the ability to control how these budget adjustments are applied. For example, if the labor forecast is being increased, you can indicate that the increased hours should be applied to the high traffic days. On the other hand, if the labor forecast is being decreased, you can indicate that the reduction in hours should not occur or should have less impact on high traffic days. You can also control how budget adjustments impact special events.
The labor constraints feature involves the following objects:
- Labor Constraints
- A labor constraint contains rules for how to adjust the labor forecast – for example, how to determine the target and how to distribute hours by day and within a day.
- Function Access Control
- Several Access Control Points enable administrators to control access to all elements of the Labor Constraint configuration, as well as allow managers to view system adjusted hours in Forecast Planner and Operational Dashboard.
- Pay Rates
- Administrators can also constrain labor cost using pay rates. Pay rates can be assigned at store, department, or job level and can be effective-dated. Rates assigned to each successive layer in the business structure override those assigned to the previous layer. (For example, if a pay rate is assigned to a department and to one job in the department, the job level pay rate would take precedence.)
- The labor constraint engine always takes a value in hours, so pay rates must be applied to the calculated constraint value and the labor forecast to convert dollars to hours.
- Adjustment Drivers.
- An adjustment driver is a labor driver that provides external data that is used in a constraint calculation for a labor target.
- Labor Constraint Profiles
- Administrators use labor constraint profiles to assign one or many constraints to sites. Many labor constraints can be grouped together and assigned to a site so that each department and location can use its own calculation.
Step 1: Set the general parameters for the labor constraint
- Go to Administration > Application Setup > Forecaster Setup > Labor Constraints and click New. You can also select an existing constraint and Edit it or Delete it.
- Enter a Name and an optional Description.
- Version Effective Dates
defaults to Beginning of time - forever.
After the labor constraint has been created, you can:
- Create a new version of the labor constraint — Select Create a New Version Effective and select an effective date.
- Edit the current version of the labor constraint— Select Update this version.
- Delete the current version of the labor constraint. Click Delete and confirm. The remaining dates are adjusted to reflect the deleted date.
- Select the Generic Department to which this constraint applies.
- All Departments.
- Select Departments. You may then select individual departments from the Available Generic Departments list below.
- In the Control Type field, indicate whether to constrain labor by the hours or cost. The Labor Constraint Engine automatically converts cost to hours using the average pay rates.
- In the Adjustment Type field, specify whether the system will make an adjustment only if the target is less than the labor forecast (Adjust Down Only) or if it will scale up or down (Adjust to the Constraint).
-
- Enter the formula, either directly in the text box, or by clickingtappingBuild Formula to access the Formula Builder window. The formula can contain metrics Measures and tracks workforce performance by comparing planned with actual workload or coverage, or by showing variances at any organizational level., numeric values, and mathematical operators such as +, -, *, /, and (). The steps that follow assume that you are using the Formula Builder tool. At any time as you enter metrics and operators to Formula Builder tool, click Append to Formula to append the formula you are entering to that in the Formula Builder window, or Replace Formula to overwrite the formula in the Formula Builder window.
- Choose a metric from the Select a Metric drop-down menu and clicktap Add to Formula. The metric is added to the Formula text box using the correct syntax.
- Choose another metric from the Select a Metric drop-down menu and clicktap Add to Formula. This metric is also added to the Formula text box using the correct syntax.
- After clickingtapping inside the Formula text box, add an operator (+, -, *, or /) between the two metrics applicable to the operation you want to perform on them.
- Repeat these actions until you have substantially constructed the desired formula or formula segment.
Step 2: Configure the job groups for the labor constraint
A job group allows you to combine jobs across the selected departments and evaluate them together or evaluate them in a defined order. The Job Groups for Constraint grid contains a set of rows for each job group to which this labor constraint will be applied. Each row has selectable columns for each day of the week to which the constraint applies, plus columns for the maximum percentage by which the labor hours for this job can be reduced (Percent Reduction (%), required) and an integer that indicates the order in which the constraint is applied to the job (Rank). The selected Generic Department determines which jobs are available for selection.
To configure a job group to which to apply a labor constraint:
- Click Create to created a new job group. To modify an existing job group, select the appropriate row and click Edit. To delete a group, select the row and click Delete.
- In the Daily Distribution section below the grid, select and configure a daily distribution method for allocating hours to all jobs in the job group grid.
- In the Period Distribution section below the grid, select and configure a period distribution method for allocating hours to all jobs in the job grid. A period distribution method is required.
Daily Distribution methods allocate hours from the weekly total to each day of the week. Select from one of the following methods:
- Proportionate to Labor Hours
- Assign hours to each day based on the contribution of the daily labor forecast to the weekly total. Select a Daily Rounding Rounding is a way to simplify payroll accounting and reporting, and to enforce shift start and end times. Punch rounds divide hours into equal segments of an hour. Threshold (0.1 through 0.9) from the drop-down list to which the labor hours will be rounded up.
-
Note: When you add rows to an existing grid, or select additional days in existing rows, only the Proportionate to Labor Hours method is available for selection.
- Less Impact on High Traffic Days
- Sort the days in reverse order of their contribution to the weekly total. This method has the effect of taking the most budget from those days with the lowest weekly contribution.
- Specific Impact on High Traffic Days
- Remove the specified number of days with the highest contribution to the weekly total. Then recalculate the distribution using the remaining days and apply it.
- Configure the following values to adjust the calculation of the distribution:
- Select the Consider Event days as high traffic days check box if desired.
- Number of days to allow increases to labor forecast
- If you are increasing the labor forecast to meet the budget, select the number of high-traffic days on which you want the labor increased. The options are 0 - 3.
- Number of days to allow decreases to labor forecast
- If you are decreasing the labor forecast to meet the labor budget, select the number of high-traffic days on which you want the labor decreased. The options are 0 - 3.
- Select the Prevent decreasing the labor forecast on high traffic days check box if you want the system to decrease the number of hours on the non-high-traffic days and not decrease the labor on the selected number of high traffic days.
- If you do not select this option and hours to be decreased remain, the system takes the remaining hours and reduces labor on the high-traffic days.
Period Distribution methods distribute the total daily labor hours to each 15-minute interval in the day. Select from one of the following methods.
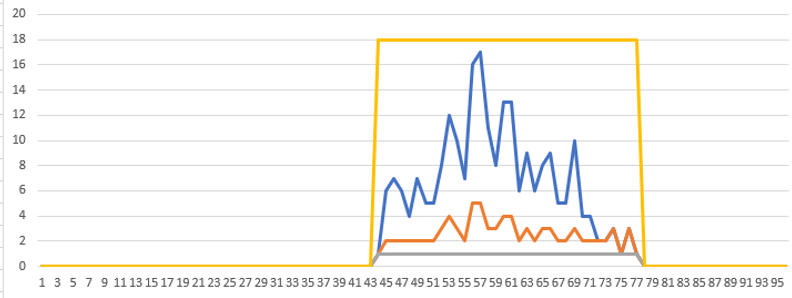
Legend for the graphs:
Blue line = Forecast
Orange line = Adjustment
Grey line = Minimum
Yellow line = Maximum
- Proportionate distribution
- Distribute labor to each 15-minute interval based on the contribution of each interval to the daily total. This method has the effect of proportionately scaling up or down the weekly labor forecast for each day using the same daily allocations that were present in the original labor forecast.
-
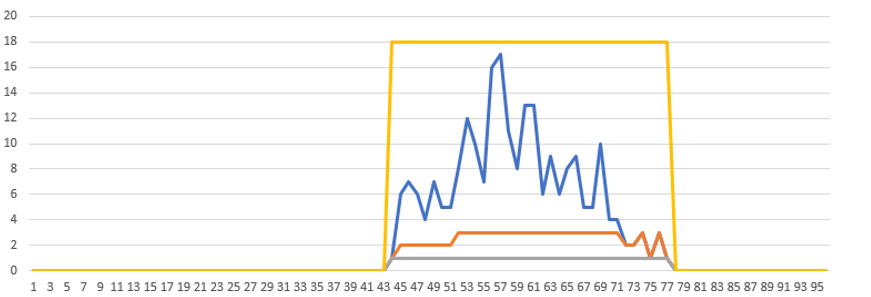
- Distribute reduction evenly
- Smooth the peaks and valleys of labor usage to simplify scheduling. This method aligns the peak of the new curve to the peak of the day.
-

- Highest peak left to right
- Starting from the left, find the highest peak and remove it. Iterate and keep removing peaks until the labor target is met.
-
- Highest peak right to left
- Starting from the right, find the highest peak and remove it. Iterate and keep removing peaks until the labor target is met.
-
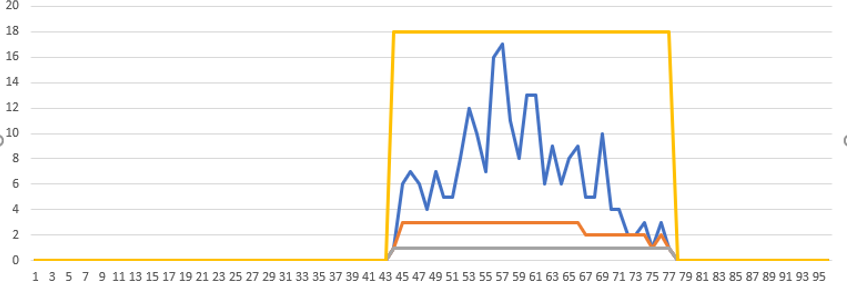
Note: The Highest peak left to right and Highest peak right to left methods are used only when the labor forecast is being scaled down. They do not scale up.
Example 1
Settings in job group grid
| Job | Days | Percent Reduction (%) | Rank |
|---|---|---|---|
| Job 1, Job 2 | All | 100 | 1 |
Hours
| Forecasted Hours | Budgeted Hours | Adjusted Hours | |
|---|---|---|---|
| Store | 120 | 110 | 110 |
| Dept A | |||
| -Job 1 | 70 | 64.1 | |
| Dept B | |||
| -Job 2 | 50 | 45.9 |
Explanation
- The budget for the combined hours of Dept A and Dept B is 110.
- 110 are allocated proportionally to jobs based on their contribution to the total labor.
- Job 1 = 70/120 = 58.3% of labor => 64.1 adjusted hours
- Job 2 = 50/120 = 41.7% of labor => 45.9 adjusted hours
Example 2
Settings in the job grid
| Job | Days | Percent Reduction (%) | Rank |
|---|---|---|---|
| Job 1 | All | 20 | 1 |
| Job 2 | All | 10 | 2 |
Hours
| Forecasted Hours | Budgeted Hours | Adjusted Hours | |
|---|---|---|---|
| Store | 120 | 110 | 110 |
| Dept A | |||
| -Job 1 | 70 | 60 | |
| Dept B | |||
| -Job 2 | 50 | 50 |
Explanation
- The hours must be adjusted down by 10 hours (Budgeted Hours - Forecasted Hours).
- Job 1 has no labor forecast limit minimum, so the maximum reduction can be 70 hours.
- The labor constraint engine takes 20% of the maximum reduction, so it could reduce the 70 hours of Job 1 by 20%, or 14 hours.
- However, it needs to adjust the hours down by only 10 hours, so it takes 10 hours from Job 1 and none from Job 2.
Example 3
Settings in the job grid
| Job | Days | Percent Reduction (%) | Rank |
|---|---|---|---|
| Job 1 | All | 20 | 1 |
| Job 2 | All | 10 | 2 |
Hours
| Forecasted Hours | Budgeted Hours | Adjusted Hours | |
|---|---|---|---|
| Store | 120 | 110 | 110 |
| Dept A | |||
| -Job 1 | 70 | 66 | |
| Dept B | |||
| -Job 2 | 50 | 45 |
Explanation
- The hours must be adjusted down by 10 hours (Budgeted Hours - Forecasted Hours).
- Job 1 has a labor forecast limit minimum of 50 hours for the week, so the maximum reduction can be 20 hours.
- The engine takes 20% of the maximum reduction, so it could reduce the 20 hours of Job 1 by 20%, or 4 hours.
- However, it must adjust the hours down by 10 hours, so it must look at Job 2. Assuming that Job 2 no labor forecast limit, the maximum that the engine can reduce Job 2 is by 50 hours. Taking 10% of 50 hours leaves it 5 hours by which it adjusts down Job 2.
- Consequently, the adjustment that is applied is 4 (Job 1) + 5 (Job 2) = 9, which falls 1 hour short of the goal of 10. That is the best result that can be achieved in this scenario.
Proportionate to Labor Hours
Scenario
- Labor forecast = 10605 hours
- Budget = 8000 hours
- Hours to remove = 2605
Results
| Day | Labor Forecast | Labor % by Day | Removal * % Contribution | Contribution Rounding | Adjusted Labor Forecast | Adjusted Labor % Day |
|---|---|---|---|---|---|---|
| Sunday | 1785 | 16.83% | 438.47 | 435 | 1350 | 16.88% |
| Monday | 1065 | 10.04% | 261.61 | 255 | 810 | 10.13% |
| Tuesday | 1350 | 12.73% | 331.61 | 330 | 1020 | 12.75% |
| Wednesday | 1980 | 18.67% | 486.36 | 480 | 1500 | 18.75% |
| Thursday | 1455 | 13.72% | 357.40 | 360 | 1095 | 13.69% |
| Friday | 1755 | 16.55% | 431.10 | 435 | 1320 | 16.50% |
| Saturday | 1215 | 11.46% | 298.45 | 300 | 915 | 11.44% |
| Total | 10605 | 2605 | 2595 | 8010 |
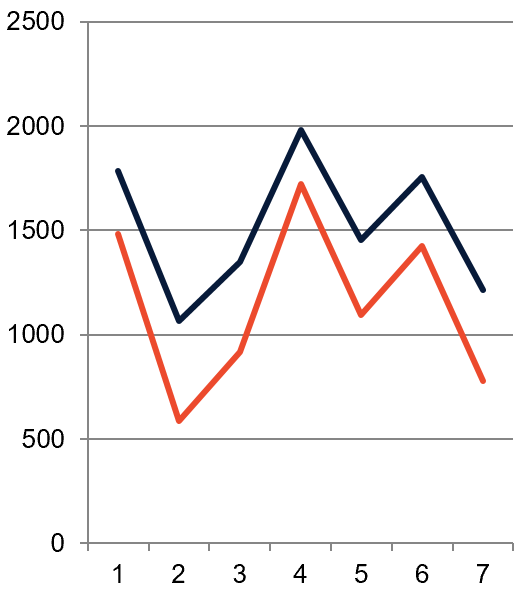
Proportionate to Labor Hours Graph
Legend:
Blue line = Labor
Orange line = Labor constraint

Less Impact on High Traffic Days
Scenario
- Labor forecast = 10605 hours
- Budget = 8000 hours
- Hours to remove = 2605
Results
| Day | Labor Forecast | Labor % by Day | Reverse Order % | Reverse % Contribution | Contribution Rounding | Adjusted Labor Forecast | Adjusted Labor % Day |
|---|---|---|---|---|---|---|---|
| Sunday | 1785 | 16.83% | 11.46% | 298.53 | 300 | 1485 | 18.56% |
| Monday | 1065 | 10.04% | 18.67% | 486.35 | 480 | 585 | 7.31% |
| Tuesday | 1350 | 12.73% | 16.55% | 431.13 | 435 | 915 | 11.44% |
| Wednesday | 1980 | 18.67% | 10.04% | 261.54 | 255 | 1725 | 21.56% |
| Thursday | 1455 | 13.72% | 13.72% | 357.41 | 360 | 1095 | 13.69% |
| Friday | 1755 | 16.55% | 12.73% | 331.62 | 330 | 1425 | 17.81% |
| Saturday | 1215 | 11.46% | 16.83% | 438.42 | 435 | 780 | 9.75% |
| Total | 10605 | 2605 | 2595 | 8010 |
Less Impact on High Traffic Days Graph
Legend:
Blue line = Labor
Orange line = Labor constraint
Delete a labor constraint
Labor constraints cannot be deleted if they are currently assigned to a labor constraint profile.