Note: This business process An organized flow of activities or tasks that achieves a business goal. An automated business process minimizes the amount of paperwork and manual tasks to complete that process by way of automatic actions, online forms, and automatically generated messages. is an extension model that is developed outside the normal release schedule to meet specific customer needs. To request one of these models, you must submit a Salesforce Service Request to UKG. After the model is delivered to your tenant, you can edit it to meet your needs.
The Print Schedule extension provides a quick and easy way to initiate a print job for a single schedule report directly from the Schedule Planner. Managers with access to reporting must have the preselected report included in their report profile to use this functionality.
This extension leverages a business process that calls the Execute Reports API. Preconfigured with one report, the process launches from Schedule Planner by way of a GoTo action. Schedule Planner selections for employees, or location, and date range are automatically passed as report parameters. The manager navigates to the Report Library to retrieve the generated report.
Schedule report types that can be attached to the process include:
Employee based
-
This report type can be printed for individual or multiple employees, but not for locations or Hyperfinds A search engine that filters and selects groups of employees through queries that specify conditions or locations (criteria)..
-
Employee selection is performed using the employee checkbox. If a Hyperfind is chosen in Schedule Planner, it is ignored.
-
Example: Employee Schedule - Weekly report.
Location based
-
This report can be printed for an entire location, but not for individual employees.
-
Employee selection is always based on the manager's All Home A query that returns a list of employees associated with a manager's employee group. All Home finds people who are active employees or active users as of today. Locations. If an employee or location is chosen in Schedule Planner, it is ignored.
-
If the report needs to be executed for a different location, the manager changes the location on the Business Process Library page.
-
Example: Location Schedule - Weekly report.
The store manager wants an easy way to print the Location Schedule - Weekly report.
-
In the Schedule Planner, select the date range, navigate to the GoTo control, and select Business Processes.
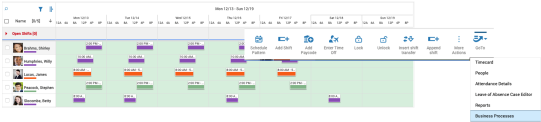
-
From the Business Process Library select Print Schedule.
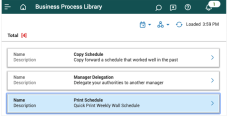
-
Use the GoTo Report Library link in the Print Schedule box to view the generated report.

- Configure access: Edit the manager's function access profile (FAP) to include the following:
Note: See the Function Access Profiles topic.
- Select Main Menu > Administration > Application Setup > Access Profiles > Function Access Profiles.
- Select the manager's profile. Click Tap Edit.
- Click Tap Manager — Department Manager.
- Click Tap Reports.
- Run reports: In Access Scope, select Allowed so that managers can run reports.
- Click Tap Save.
- Configure report profile: Edit the manager's report profile to include the schedule report attached to the business process.
Note: See the
- Select Main Menu > Administration > Application Setup > Access Profiles > Data Access Profiles.
- Select the manager's profile. Click Tap Edit.
- Select the report that is attached to the business process.
- Click Tap Save.
Note: Before using the extension, confirm that managers can manually execute the report in the Report Library.
- Configure workflow notification Informs people to run business processes or integrations, complete forms, or respond to events in business processes. Example: Approve a time-off request.: To create a workflow notification:
Note: See the
- Select Main Menu > Administration > Application Setup > Event/Notification > Workflow Notifications.
- Click Tap New
- In the Select Notification Type box, select Generic notification and click tap OK.
- Give the notification a Name; for example, Print Schedule Status.
- (Optional) Add a description.
- Select the Recipient List will be supplied at runtime or Send to employee boxes, as appropriate.
- Enter the Subject line, as appropriate.
- Enter the Long Message, such as:
- Print Schedule Status:
- URL: <URL of Report Library Page for specific tenant>
- Complete the Control center fields. For example:
Field 1 Label: Report:
Field 1 Value: <reportLabel>
Field 2 Label: Hyperfind & Locations:
Field 2 Value: <dataSource>
Field 3 Label: Selected Time Period:
Field 3 Value: <timeFrame>
Field 4 Label: Status:
Field 4 Value: <executionStatus>
Field 5 Label: Message:
Field 5 Value: <executionMessage>
- Click Tap Save.
- Migrate the business process model to the tenant: Migrate the Print Schedule Process model to the customer tenant using Setup Data Manager (SDM) Moves and manages configuration data across software and hardware environments. (SDM Setup Data Manager moves and manages configuration data across software and hardware environments.).
- Log in to the tenant to which you are migrating the process model.
- Go to Main Menu > Administration > Setup Data Manager.
- Select the Source tenant where the Process Model resides and select the template to copy. It is a .zip file.
In the Source column, a message states: Source: Import from <filename>.zip.
Click Tap Review and Publish. The Publish Summary panel appears.
Review the Publish Summary panel. It lists the items that were extracted from the migration file. If you approve, click tap Publish with Comment or just Publish.
Click Tap Go to Publish History at the bottom of the panel to view the status of the data transfer. The Publish History page contains a table that lists the items you have published. If there were errors during the transfer, the button under the Errors column for that row is black.
To view details, click tap the appropriate row and click tap View Selected.
On the History for publish run page, click tap Show all to view the setup data that you published, and the errors that occurred, if any, listed by item type and name.
- Configure the variables decision table
Edit the decision table: PrintSchedule_Variables
The PrintSchedule_Variables decision table holds the variables for the report attached to the process and can be changed accordingly.
Example: Attach the Location Schedule - Weekly report to the process.
- Go to Main Menu > Administration > Application Setup > Business Process Setup > Process Models. Select the Print Schedule process and click tap Edit. The process model enters edit mode.
- Select the Decision Tables section.
- Click Tap on decision table PrintSchedule_Variables.
- The decision table contains two columns — dt_input and dt_output.
Click Tap Decision Table Editor to add or update the rows in the table.
[dt_input] [dt_output] 1 =="ReportName" "location_schedule_weekly" 2 =="ReportType" "location" 3 =="Message" "Report Started" 4 =="MessageInvalidReportType" "Incorrect report type provided". 5 ==MessageAPIFailure" "Please contact system administrator." 6 =="OutputFormat" "NULL" 7 =="ReportLibraryUrl" "<tenant specific URL of the Report library>" - Click Tap Save and close.
PrintSchedule_Variables decision table parameter information.
Validation type Value type Description Default values 1 ReportName String Name of the report 2 ReportType String Employee or location 3 OutputFormat String Report format (PDF, XLSX, Interactive (Desktop), CSV).
If set to NULL, report default output format is used.
NULL 4 MessageAPIFailure String API failure message. Please contact system administrator. 5 Message String Report initiation message. Report initiated. 6 MessageInvalidReportType String Incorrect report type provided. Incorrect report type provided. 7 ReportLibraryUrl String Report Library Page URL of application.
Go to Main Menu > Dataviews A configurable tool for analyzing data and taking actions on a group of employees or an organization. & Reports > Report Library.
Copy the URL from Report Library Page.
NULL Note:The values used in the Decision Table are all case sensitive.
Deploy only the main process; do not deploy the subprocesses.
Do not open the subprocesses from main process; open them separately.
- Deploy Process Model
Note: Process models must be redeployed every time changes are made to an existing model. Re-deployment is not required for decision table changes.
Follow these steps to deploy the process model. For detailed information, see the online help topic Deploy Business Process Models
- From the Main Menu, go to Application Setup > Business Process Setup > Process Models.
- Select the process and click tap Deploy
. - On the Business Process page, configure the required parameters and deployment dates.
- Select Validation from the Template Categories.
- Click Tap Save and then Return.
| API name | Section | Type | Resource path | Location | Description |
|---|---|---|---|---|---|
| Run Report | Platform | POST | /v1/platform/reports/{reportName}/execute | Generate report API | To run report |
| Retrieve Published Reports | Platform | GET | /v1/platform/reports | Get Report Label | To fetch report label and default output format |